
3.1. Creating a New Project
먼저 새 프로젝트를 만들기 위해 File > New Project 명령이나 Ctrl + N 키를 이용한다. Options > Preferences 대화상자의 Project 페이지에는 새 프로젝트를 만들때 리퍼의 동작 방식을 결정하는 옵션들이 있다.
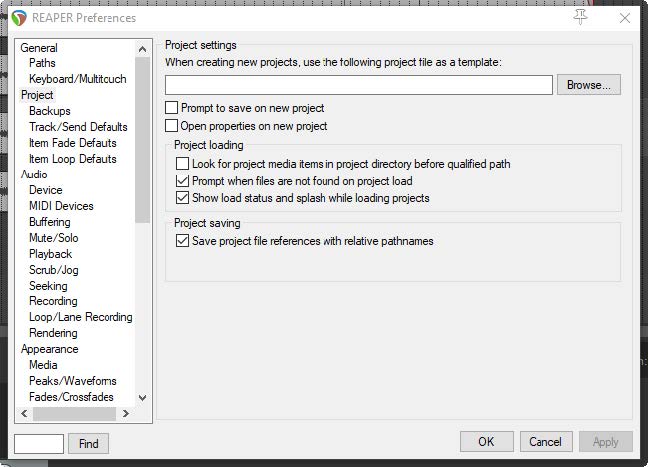
- Use project file as a template: 기존 프로젝트 파일을 새 프로젝트의 템플릿으로 이용한다.
- Prompt to save on new project: 이 옵션을 켜두면, 새 프로젝트를 만들 때마다 즉시 저장하도록 창이 뜬다.
- Open properties on new project: 이 옵션이 선택되면, 새 프로젝트를 만들 때마다 Project Options 대화창이 뜬다.
추가해서, Options > Preferences > Project > Backups 페이지에는 프로젝트의 백업과 관련된 여러 옵션들이 있는데, 기존에 저장된 버전을 유지할지 여부, 그리고 지정된 기간마다 자동을 시간 지정된 저장 파일을 만들지 여부 등이다. 이 옵션들은 갑자기 전원이 꺼지거나 시스템 충돌이 발생하는 등의 예기치 못한 사고로부터 도움이 될 수 있다. 이 파일들은 프로젝트 디렉토리나 다른 디렉토리에 저장할 수도 있다. 또한 자동 저장 주기를 지정할 수도 있고, 녹음하지 않을 때, 재생을 멈췄을 때, 아무 때 등을 선택해서 저장할 수도 있다.
3.2. 프로젝트의 미디어 옵션 설정
선호하는 미디어 설정을 미리 해두기 위해 Alt + Enter 단축키를 이용해 Project Settings 창을 열고, 특히 오디오 포멧을 점검해야 한다. 어떤 형식을 선택해야 할지 잘 모르겠다면, 그림처럼 CD 품질의 .WAV 형식을 선택할 수 있다. 원한다면 나중에 내보내기 포멧은 .MP3와 같은 다른 형식으로 지정할 수 있다.

그림의 설정은 출력물이 CD 오디오 품질로 내보내기 위한 것이다. 보통은 녹음에는 24 bit, 내보내기는 16 bit가 선호되는 편이다. 만약 녹음이 CD 품질이 아닌 DVD 수준으로 되길 원한다면 샘플레이트를 44100가 아닌 48000으로 지정해야 한다. 이 설정은 프로젝트 설정 창의 Project Settings 메인 페이지에 있다. 다만, 샘플레이트를 올린다면 미디어 항목들의 크기가 커지고 처리 시간이 늘어난다는 단점도 있다.
3.3. 프로젝트 파일 저장하기
프로젝트를 만든 후 File > Save Project 명령이나 Ctrl + S 키를 이용해 저장한다. 먼저 프로젝트 이름을 지정해줘야 한다. 새 파일을 저장할 때는 몇 가지 옵션들을 선택할 수 있다.

Create subdirectory for project 옵션으로 하위 디렉토리를 만들 수 있다. Copy all media into project directory 옵션으로 사용된 미디어 파일들을 프로젝트 디렉토리로 복사하고, 이 때 복사하면서 변환시킬 포멧을 지정할 수 있다. Move all media into project directory 옵션을 선택하면 기본적으로 프로젝트에서 사용된 모든 미디어 파일들이 프로젝트 디렉토리로 옮겨진다. 그 옆의 Copy rather than move source media if not in old project media path 옵션을 선택할 수도 있다. 예를 들어 프로젝트에서 샘플 라이브러리의 미디어 파일들을 이용하는 경우, 라이브러리에서 해당 파일을 지우길 원치 않을테니 이럴 경우 사용한다.
어떤 변화를 준 후에는 항상 저장하는 습관이 들이는 것이 좋다. 간단하게 Ctrl + S 키를 누르면 된다.
이 아래는 같은 내용을 영문으로 번역한 것임.
The above is a Korean translation of the same below.
3.1. Creating a New Project
First, to create a new project file, you can either use the File > New Project command or press Ctrl + N. The Project page within the Options > Preferences dialog box can be used to determine how REAPER behaves each time you create a new project.
Use project file as a template: This enables you to use an existing project file as a template for new projects.
Prompt to save on new project: If you enable this option, you will be prompted to save your new projects immediately they are created.
Open properties on new project: If this option is selected, the Project Options dialog box will automatically be displayed every time you create a new project.
In addition, the Options > Preferences > Project > Backups page offers you various options for backing up your projects, such as whether to preserve previously saved versions of the project, and whether to automatically save to a timestamped file at intervals you specify. This can help to protect you from the consequences of an unforeseen circumstance such as a power outage or a computer crash. You can save these files to the project directory and/or an additional directory. You can also specify the frequency of automatic saving, and whether to apply this when not recording, when stopped, or at any time.
3.2. Setting Media Project Options
You can display the file’s Project Settings window with Alt + Enter key to ensure you are using your preferred Media Settings. In particular, check the audio format. If you are not sure, for CD quality select .WAV, with settings similar to those shown here. If you wish later to use some other format such as .MP3 you can render your files in that format.
The settings shown would be suitable when the output is to be rendered to CD audio. As a rule, 24 bit is preferred for recording, 16 bit for rendering. If the recording is to be finalised in DVD format rather than CD, you should consider a sample rate of 48000 instead of 44100. This is specified on the main Project Settings page. Increasing sample rate also increases media item file size and might slow down processing.
3.3. Saving the Project File
After creating a file, use the File > Save Project command or Ctrl + S to save it. You will need to specify a project file name. When saving a new file you are offered a number of options.
You can choose to Create subdirectory for project. If you also select Copy all media into project directory you may also specify a format for these items to be converted. If you select Move all media into project directory, then by default all media files used by the project will be moved into the project subdirectory. Optionally you can ask to Copy rather than move source media if not in old project media path. You would be likely to choose this, for example, if your project uses files from a samples library, to ensure that the samples are not removed from the library.
You should also make sure that you get into the habit of frequently resaving your project after making changes. The easiest way to do this is simply to press Ctrl + S.
'오락과 여흥 > Reaper (리퍼)' 카테고리의 다른 글
| 리퍼 사용자 가이드 - 3-3. 메트로놈과 템플릿 이용 (1) | 2023.11.25 |
|---|---|
| 리퍼 사용자 가이드 - 3-2. 녹음 개요 (1) | 2023.11.13 |
| 리퍼 사용자 가이드 - 2-8. 기타 설정과 공장 초기화 (0) | 2023.11.08 |
| 리퍼 사용자 가이드 - 2-7. 라우팅과 와이어링 기본 (0) | 2023.11.07 |
| 리퍼 사용자 가이드 - 2-6. 시간 선택과 루프 (0) | 2023.11.06 |


댓글