2.18. 리퍼 라우팅 기초
라우팅(Routing)이란 미디어 출력을 원하는 곳으로 보내는 것을 말한다. 이미 앞에서 FX 버스를 만들면서 기초적인 예제를 다뤄봤다. 기본적으로 리퍼는 새 트랙의 출력이 마스터 트랙으로 보내지고, 거기서 사운드 카드 출력으로 보내지게 된다. 물론 이런 설정으로 충분하다면 더 이상 라우팅에 대해 공부할 필요는 없다. 하지만 리퍼의 라우팅 기능을 더 깊게 알아보는 것은 앞으로 더 큰 이점을 가질 수 있게 해 줄 것이다.

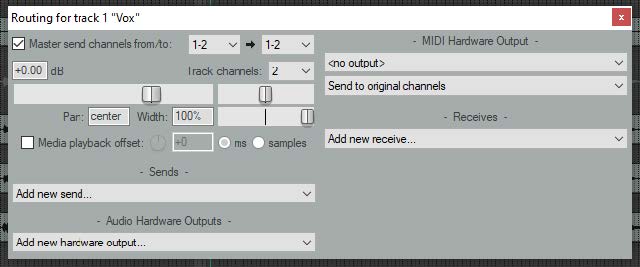
각 트랙에는 Routing 단추가 달려있다. 그 위에 마우스 커서를 올려두면 툴팁으로 송신과 수신 트랙이 표시되게 된다. 단추를 클릭하면 트랙 라우팅 창이 표시된다.

- Master send channels: 이 채널들로 트랙의 출력이 마스터로 보내진다. 대개 채널 1-2의 출력을 마스터에 직접 보내게 될 것이다.
- Parent channels: 위 그림에서는 채널 1과 2 스테레오를 통해서 오디오를 마스터로 보내지고 있는데, 이것이 기본 설정이다. 필요하다면 모노 신호를 마스터로 보낼 수 있는데, 그 경우 첫 번째 내림 상자에서 1을 선택하고, 부모 채널 내림 상자에서 1 또는 2로 단일 채널을 선택한다.
- Sends: 트랙의 출력은 샌드를 통해 다른 트랙들로 보내질 수 있다.
- Audio Hardware Outputs: 마스터 버스에 추가해서, 또는 그 대신에 트랙 출력을 직접 오디오 장비의 출력단으로 보낼 수 있다. 가지고 있는 오디오 장비가 다중 출력을 지원한다면, 예를 들어 분리된 여러 헤드폰 믹스를 만드는 등의 작업에 활용할 수 있다.
- MIDI Hardware Output: 미디 출력을 외부 장치로 보낸다.
- Receives: 앞의 예제에서 FX 버스가 두 개의 수신 항목을 가졌었는데, 각각은 기타 트랙으로 부터 송신을 받았었다.
- Playback time offset: 이 부분은 서드 파티 VST 악기가 레이턴시를 가지는 경우 그것을 보상하기 위해 사용된다. 이 부분은 10장에 더 다룬다.
2.19. 트랙 패널에 샌드 표시
Options > Show sends in TCP (when size permits) 명령을 이용하면 샌드를 트랙 패널에 표시할 수 있다. 이렇게 하면 샌드 음량같은 부분을 라우팅 창을 열지 않고도 바로 조절할 수 있다.

표시된 샌드를 클릭하면 모든 샌드 관련 컨트롤들에 접근할 수 있으며, 우클릭을 하면 Mute send, Remove send, Show track routing window, 그리고 Go to destination track 같은 메뉴들이 뜬다.

2.20. 라우팅 매트릭스
리퍼의 라우팅 매트릭스는 프로젝트 전체의 라우팅 구조와 관련한 모든 작업을 한 곳에서 다 할 수 있는 원스톱 창이다. 이 창에서 송수신 설정을 추가하거나 삭제할 수도 있고 음량이나 패닝 같은 매개변수들을 조절할 수도 있다.

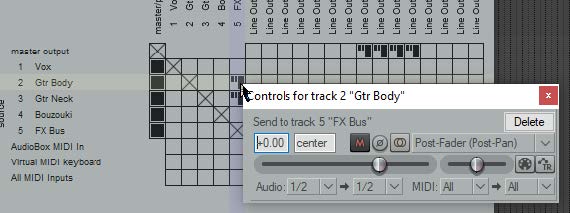
Alt + R 단축키를 누르면 라우팅 매트릭스가 표시된다. 예를 들어 All Through The Night with Bus 프로젝트라면 그림과 비슷한 창이 열릴 것이다. 가운데 매트릭스에서 Gtr Body 행(가로)이 FX Bus 열(세로)과 만나는 격자를 보면 작은 얼룩 같은 것이 표시되어 있다. 그 격자를 왼쪽 또는 오른쪽 클릭하면, Gtr Body 트랙의 신호를 FX Bus 트랙으로 보낼 때 조절할 수 있는 컨트롤들이 표시된 창을 열 수 있다.
2.20.1. 매트릭스 표시를 단순하게
만약 사운드 카드가 다중 출력을 지원한다면, 기본적으로 리퍼의 라우팅 매트릭스는 두 출력의 쌍을 가능한 여려 조합으로 표시할텐데, 그 중에는 거의 필요없는 것들이 있을 수 있다. 보통은 스피커에는 1과 2, 헤드폰 앰프에는 3과 4와 같은 "자연스러운" 조합만을 사용할 것이다. 예를 들어 2와 3을 쌍으로 사용하는 경우는 거의 없을 것이다. 이런 조합들을 표시하지 않으려면, Options > Preferences > Audio 페이지를 선택하고, Channel naming/mapping 섹션에서 Show non-standard stereo channel pairs 옵션을 꺼둔다.
2.21. 트랙 와이어링 뷰
지금까지 리퍼에서 라우팅 설정을 관리하는 세 가지 방법들을 봤다.
- TCP나 MCP 뷰에서 잡아 끌기.
- 트랙 라우팅 창 이용.
- 라우팅 매트릭스 이용.
이제 네 번째 방법으로 트랙 와이어링을 알아보자. 트랙 와이어링 창에서는 단순히 라우팅을 새로 만드는 것 뿐 아니라, 프로젝트의 라우팅 구조를 전체적으로 파악할 수도 있고, 각 라우팅 설정을 관리할 수도 있다. 예를 들어, 언젠가 만들어 두고서는 잊어버린, 그래서 지워야 할 라우팅을 찾을 때도 도움이 된다. 이 섹션에서는 트랙 와이어링 창을 살펴본다.
2.21.1. 개요
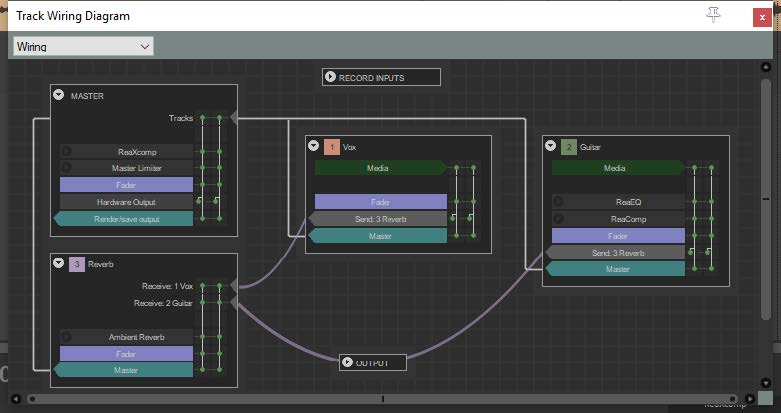
트랙 와이어링 창은 View 메뉴의 Track Wiring 명령으로 연다. 창의 왼쪽 위에 있는 내림 상자를 이용해서, 라우팅 매트릭스, 와이어링, 트랙 묶음 매트릭스, 그리고 랜더링 영역 매트릭스의 네 가지 뷰 모드를 선택할 수 있다. 보통은 트랙 와이어링과 라우팅 매트릭스를 오가며 사용하게 될 것이다. 간단한 예로 시작해보자.

위 그림에서는 두 개의 녹음 트랙과 하나의 리버브 트랙이 프로젝트에 있다.
- 흰색 실선으로 표시된 직선은 마스터로 가는 샌드를 표현한다.
- 트랙 이름을 마우스로 잡아 끌어 옮겨보라.
- 곡선은 한 트랙에서 다른 트랙으로 가는 샌드를 표현한다.
- 트랙 번호 왼쪽의 작은 삼각형은 트랙의 상세 정보를 열고 닫는 역할을 한다.

마지막 항목의 경우 트랙이 아주 많고 라우팅이 복잡하게 연결되어 있는 경우 유용할 수 있다. Vocals와 Music 폴더와 그에 속한 자식 트랙들의 표현 방식을 확인하자.
2.21.2. 트랙 라우팅 관리
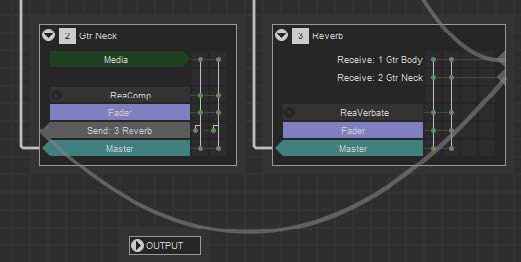
“보통”의 모드에서 각 트랙에는 트랙 번호와 이름, 미디어 항목, FX, 조절기 관련 정보, 채널과 샌드 등의 정보가 표시된다.

그림에서 Gtr Neck 트랙에는 미디어 항목이 있으며, ReaComp라는 하나의 FX, Reverb 트랙으로 보내지는 샌드와 마스터로 보내지는 샌드가 있다. 두 개의 채널을 사용하므로 두 개의 세로 선이 오른쪽에 표시된다. Reverb 트랙은 미디어 항목은 없으며, 트랙 1과 2로부터의 수신, ReaVerbate라는 FX, 그리고 마스터로 보내지는 출력이 표시되어 있다.
- FX 이름을 클릭하면 그 FX의 창이 떠서 매개변수를 조정할 수 있으며, param 단추 오른쪽에 "1 in 2 out"처럼 표시되어 있는 핀 커넥터 창을 열 수도 있다.
- FX 이름 왼쪽의 작은 회색 삼각형을 클릭하면 그 FX에 대한 모든 라우팅 정보들이 표시된다.

- Fader를 클릭하면 해당 트랙에 대한 라우팅 창이 뜬다.
2.21.3. 샌드 만들기
트랙 와이어링 창에서도 트랙 사이의 샌드를 만들 수 있다. 만들어지는 샌드의 유형은 잡아 끌 때 마우스의 위치에 따라 결정된다. 먼저 마우스 커서를 트랙 상자 위에 올려 놓아보자. 그러면 세 개의 박스로 둘러싸인 작은 + 기호들이 트랙상자의 왼쪽에 생기게 된다.
- FX 체인의 첫 번째 FX 옆 + 기호를 잡아 끌어서 다른 트랙에 놓으면 프리 페이더 (프리 FX) 샌드가 만들어진다.
- Fader 상자 옆의 + 기호를 잡아 끌어서 다른 트랙에 놓으면 프리 페이더 (포스트 FX) 샌드가 만들어진다.
- Master 상자 옆의 + 기호를 잡아 끌어서 다른 트랙에 놓으면 포스트 페이더 (포스트 FX) 샌드가 만들어진다.
트랙 상자 안의 Send로 시작하는 항목을 클릭하면 해당 샌드의 조절 창이 열려서, 샌드 유형을 바꾸거나 음량/팬 등을 조절하거나, 보내는 채널을 변경하거나, 해당 샌드를 지울 수도 있다.
2.21.4. 마스터 수정하기
트랙 와이어링 창에서 마스터 설정을 수정할 수도 있다.
- MASTER 상자 안의 FX 이름을 클릭하면 해당 FX의 창이 떠서 매개변수를 조절할 수 있다.
- MASTER 안의 Fader를 클릭하면 마스터의 하드웨어 출력 창이 떠서, 하드웨어 출력을 변경하거나 지울 수 있다.
2.21.5. 컨텍스트 메뉴
프로젝트가 더 복잡해질수록 트랙 와이어링 구조는 더욱 복잡해질 수 있다. 이럴 때는 컨텍스트 메뉴가 도움이 될 수 있다. 트랙 와이어링 창의 빈곳에서 마우스 오른쪽 단추를 클릭하면 아래와 같은 메뉴가 보일 것이다.

아래 세 가지 옵션들을 이용해 복잡한 와이어링 구조를 정돈할 수도 있다.
- Only show send wires on track on mouseover
- Only show hardware output/input wires on track mouseover
- Show routing controls when creating send/hardware output.
뭔가를 잡아 끌어다 놨는데 복잡하게 엉켜버렸다면 Reset all track positions 명령이 문제를 해결하는데 도움이 될 수 있다. 메뉴를 이용해 창을 도커에 고정하거나 해제할 수도 있다.
이 아래는 같은 내용을 영문으로 번역한 것임.
The above is a Korean translation of the same below.
2.18. REAPER Routing Essentials
Routing directs media output to where you want it to go. You encountered a basic example earlier, when we looked at creating and using an FX bus. By default the output of each new track is routed to the Master track and from there to the output of your sound card. If that is all you need, you do not need to study other routing options. However, understanding REAPER’s routing capabilities in greater depth might enable you to get more benefits.
Each track includes a Routing Button in its panel. Hover the mouse over this button to display a tool tip showing any sends and/or receives associated with that track. Clicking the button opens the routing window for that track.
- Master send channels: these direct the track’s output to the Master. In most cases you will want to direct the output of channels 1-2 directly to the Master.
- Parent channels: The example shown above directs audio to the master via channels 1 and 2 (stereo), this is the default. If you wish to send a mono signal to the master, select 1 from the first drop down, then a single channel from the parent channels drop down such as channel 1 or 2 only.
- Sends: A track's output can be routed via a send from any track to any other track or tracks.
- Audio Hardware Outputs: As well as, or instead of directing output to your Master Bus, you can direct output of any track directly to hardware outputs on your audio device. If this device has multiple outputs, this can be useful, for example, for creating a headphone mix, or a series of separate headphone mixes.
- MIDI Hardware Output: Directs MIDI output to an external device.
- Receives: In the earlier example, the FX bus included two receives, one from each of the two guitar tracks in that project file.
- Playback time offset: This can be used to enable REAPER to compensate for any latency that might be created by a third party VST instrument. This explained in detail in Chapter 10.
2.19. Showing Sends in the Track Panel
The Options > Show sends in TCP (when size permits) command can be used to display your sends in the track panel. You can make adjustments, such as to the send volume, without needing to open the routing window.
You can also click on the send to access all of the send controls, or right click for a menu which includes Mute send, Remove send, Show track routing window and Go to destination track.
2.20. The Routing Matrix
REAPER's Routing Matrix is a “one stop” window where you can manage and arrange a project's entire routing structures. For example, you can add and delete sends and receives and manage their various parameter controls, such as volume and pan.
Press Alt + R to display the routing matrix. For the project file All Through The Night with Bus it should resemble that shown below. Observe the cell in the matrix where the Gtr Body row intersects with the FX Bus column. It contains two small blobs. By left or right clicking over this cell, you can cause the controls to be displayed which determine how the signal from the Gtr Body track is sent to the FX Bus.
2.20.1. Simplifying the Matrix Display
If your sound card has multiple outputs, then by default, REAPER’s Routing Matrix will display multiple permutations of paired outputs, including several that you might not need. You might want to use only “natural” pairs for example 1 and 2 as one pair for your speakers, and 3 and 4 as another for a headphone amp. It would be unusual to use, say, 2 and 3 together as a pair. To hide these unwanted combinations, from the main menu choose Options > Preferences > Audio. In the Channel naming/mapping section you can turn off the option to Show non-standard stereo channel pairs.
2.21. The Track Wiring View
Until now, there have been three main ways of managing track routing within REAPER.
● Drag and drop in TCP or MCP view.
● Using a track’s routing window.
● Using the Routing Matrix.
Now you have a fourth option, Track Wiring. Track Wiring view cannot just be used to create routing, it also gives you an overview of your project’s routing, and allows you to manage it. For example, it can help you to identify any routing you may have created and forgotten about, but which needs to be deleted. This section introduces you to Track Wiring and explores its environment.
2.21.1. Overview
Track Wiring is accessed directly from the View menu. Let’s start with a simple example. You can use the dropdown list in the top left corner of window to switch between any of the four listed view modes which are routing matrix, wiring, track grouping matrix, and region render matrix. This can be especially useful for switching between the track wiring diagram and the routing matrix.
Above you see the track wiring view for a project with two recorded tracks and one reverb track.
- The solid straight white lines depict sends to the master.
- Click and hold on any track name to drag and drop it around at will.
- The curved lines represent sends from one track to another.
- The little arrow next to the track number can be used to collapse/ expand the display of detailed track information for individual tracks.
The last can be especially useful if your file has a large number of tracks and/or more complex routing. Notice also how the Vocals and Music folders and their child tracks are depicted.
2.21.2. Track Routing Management
In “normal” mode for each track the following overview information is displayed: track number and name, media, fx, fader information, channels and any sends.
The Gtr Neck track shown here contains media, one FX (ReaComp) one send (to the Reverb track) and a send to the master. It uses two channels hence the two vertical lines on the right. The Reverb track contains no media, has receives from tracks 1 and 2, contains ReaVerbate and also directs its output to the master.
- Click on any FX name to open its UI, you can then adjust any of its parameters, and/or access its the pin connector which is next to param button and has label like 1 in 2 out.
- Click the little grey triangle on the left side of the FX name to show all routing information for that FX.
- Click on the Fader to open the routing window for that track.
2.21.3. Creating Send
You can create new sends between tracks in Track Wiring view. The send type will be determined by exactly where you position the mouse before dragging. Hover the mouse over the body of any track box and you will see three boxed tiny + symbols on the left side of the track box.
- Click and drag from the symbol beside the first FX in the FX chain to the destination track to create a Pre fader (Pre FX) send.
- Click and drag from the symbol beside the box labeled “Fader” to the destination track to create a Pre fader (Post FX) send.
- Click and drag from the symbol beside the box labeled “Master” to the destination track to create a Post fader (Post FX) send.
Within any track box, click on the Send to open the control window for that send. Here you can modify or delete this send, for example to change the send type, adjust volume and/or pan, or specify destination channels.
2.21.4. Modifying Master
You can also modify MASTER settings in Track Wiring view.
- Click on any FX listed within the MASTER box to open its UI, where you can adjust any of its parameters.
- Within the MASTER box, click on the text “Fader” to open its hardware outputs window, Here you can add, adjust, or remove hardware outputs.
2.21.5. Context Menu
The more complex the project, the more complex the track wiring diagram. This is where the context menu can be helpful. Right click anywhere in the Track Wiring window to display the menu shown below.
You can “unclutter” the diagram using any or all of the three toggle options shown.
- Only show send wires on track on mouseover
- Only show hardware output/input wires on track mouseover
- Show routing controls when creating send/hardware output.
If you get into a tangle after dragging and dropping things around, Reset all track positions will get you out of trouble. This menu also includes the option to Dock or Undock this window.
'오락과 여흥 > Reaper (리퍼)' 카테고리의 다른 글
| 리퍼 사용자 가이드 - 3-1. 녹음 준비하기 (0) | 2023.11.10 |
|---|---|
| 리퍼 사용자 가이드 - 2-8. 기타 설정과 공장 초기화 (0) | 2023.11.08 |
| 리퍼 사용자 가이드 - 2-6. 시간 선택과 루프 (0) | 2023.11.06 |
| 리퍼 사용자 가이드 - 2-5. FX 기초 2 (0) | 2023.11.04 |
| 리퍼 사용자 가이드 - 2-4. FX 기초 1 (1) | 2023.11.04 |


댓글