
2.3. 트랜스포트 바
만약 트랜스포트 바가 보이질 않는다면 View > Transport 명령을 이용하거나 단축키 Ctrl + Alt + T를 이용해서 보이게 한다. 트랜스포트 바의 모습이 정확히 똑같지는 않아도 대략 아래 그림과 같을 것이다.

처음 네 단추는 일반적이다. 처음으로 가기, 마지막으로 가기, 녹음과 재생이다. 그 뒤에는 루프 반복하기를 켜고 끄는 단추이고, 다음은 중지(Stop)와 멈춤(Pause) 단추이다. 중지는 재생을 중지하고 재생을 시작했던 위치로 커서를 되돌린다. 멈춤은 그냥 재생만 멈추기만 하고 커서를 되돌리지 않는다.
녹음 단추를 클릭하면 녹음을 시작하고, 다시 클릭하면 녹음을 중지하는데, 재생을 멈추지는 않는다. 하지만 녹음 중에 중지 단추를 누르면 재생과 녹음을 모두 중지한다. 루프 반복 단추는 반복 선택이 된 부분을 계속해서 반복하는 옵션을 켜거나 끈다.
다음으로 현재 커서 위치 표시가 있고, 그 다음으로 현재 재생 상태(Playing, Paused 또는 Stopped)가 표시된다.
그림에서 아래 쪽의 가장 왼쪽으로는 현재 선택 영역(시작 위치, 끝 위치, 길이) 표시가 보인다.
다음으로는 박자표와 프로젝트 템포 (BPM) 값이 편집 가능한 상자로 표시된다. 이 값을 변경하려면 텍스트 상자를 클릭하고 값을 적어넣으면 된다. 또는 마우스 설정(22장 참고)에 따라 마우스 휘을 이용해 값을 바꿔줄 수도 있다. 다음에 보이는 Global Automation Override 기능은 18장에서 설명한다. 마지막으로 재생 속도 설정이 있다. 조절기를 이용해서 재생 속도를 빠르거나 느리게 바꿀 수 있다. 이를 이용해 재생 속도를 변경하면 조절기의 색이 녹색으로 바뀌며, 조절기를 더블클릭하면 속도 값이 1.0으로 초기화된다. 또는 오른쪽 상자 위에 마우스를 올리고 휠을 이용해서 값을 조절할 수도 있다.
세 가지 유용한 조절 키가 더 있는데, Ctrl + 왼쪽 방향키는 약간 되돌리기, Ctrl + 오른쪽 방향키는 약간 더 진행시키기(forward), 그리고 Alt + Space 키는 루프 반복을 건너뛰고 재생하기이다.
팁: Options 메뉴의 Continuous scrolling 명령을 주목해보자. 기본 설정으로 비활성화되어 있다면, 재생시 커서가 왼쪽에서 오른쪽으로 스크롤되게 된다. 이 옵션을 활성화시키면, 재생하는 동안 커서는 항상 편곡화면 중간에 멈춰있고, 미디어 항목들만 스크롤되게 된다.
2.4. 이동과 확대 축소
2.4.1. 메인 메뉴나 단축키로 확대 축소
몇 가지 확대 축소 액션이 View > Zoom 메뉴 아래에 있다. 키보드 단축키는 다음과 같다.
- 수평 방향 확대: + 또는 위쪽 방향키.
- 수평 방향 축소: - 또는 아래쪽 방향키.
- 선택 영역으로 확대: Ctrl + 숫자 패드의 + 키
- 모든 트랙들의 높이를 같은 크기로 키우기: PgUp 키
- 모든 트랙들의 높이를 같은 크기로 줄이기: PgDn 키
2.4.2. 키보드로 스크롤링 하기
다음 키들이 스크롤링에 사용된다.
- 뷰를 아래쪽으로 내리기: Alt + 아래쪽 방향키
- 뷰를 위쪽으로 올리기: Alt + 위쪽 방향키
- 뷰를 왼쪽으로 이동: Alt + 왼쪽 방향키
- 뷰를 오른쪽으로 이동: Alt + 오른쪽 방향키
2.4.3. 마우스 휠로 확대 축소 또는 이동
마우스 휠을 이용해서도 이동하거나 확대 축소할 수 있다.
- 수평 방향 확대: 휠을 위 아래로 스크롤.
- 수평 방향 이동: Alt + 휠을 위 아래로 스크롤.
- 수직 방향 확대: Ctrl + 휠을 위 아래로 스크롤.
- 수직 방향 이동: Ctrl + Alt + 휠을 위 아래로 스크롤.
Help > Keybindings and mouse modifiers 명령 또는 Shift + F1 키를 누르면 웹브라우저를 통해 리퍼 마우스 한정키와 단축키 페이지에 연결된다. 15장에서 보겠지만, 자신만의 한정키와 단축키, 그리고 액션 키 등을 지정해서 작업 흐름을 더 원활하게 할 수도 있다.
2.5. 네비게이터
리퍼 네비게이터는 프로젝트 개관을 보여주는 창이다. 이걸 이용해서 프로젝트의 특정 영역으로 확대 축소해서 옮겨다닐 수 있다. 네비게이터 창을 띄우는 메뉴는 View > Navigator 명령이다. 또는 Ctrl + Alt + V 단축키를 이용해 네비게이터를 켜거나 끌 수 있다.
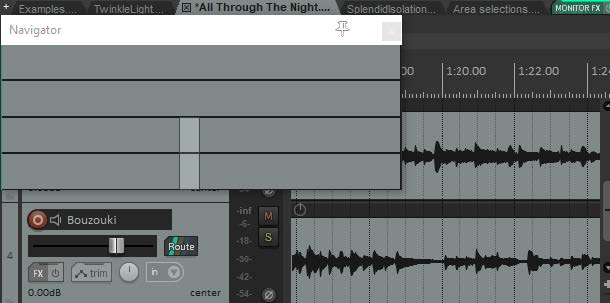
현재 보고 있는 영역을 표시하는 네비게이터 창의 박스 위에서, 간단하게 마우스로 클릭해 끌어 옮겨놓음으로써 보기 영역을 이동시킬 수 있다. 또다른 작동 방식은 다음과 같다.
- 보기 영역 지정: 마우스 우클릭 후 끌기
- 보기 영역 옮기기: 마우스 좌클릭
- 트랙 (세로) 방향으로만 확대 축소: Alt + 우클릭 후 끌기
- 시간 (가로) 방향으로만 확대 축소: Ctrl + 우클릭 후 끌기
- 보기 영역 이동: 좌클릭 후 끌기
- 재생 영역과 함께 커서도 이동: Ctrl + 좌클릭 후 끌기
2.6. 점프해서 커서 이동
View > Go to > Jump to... 명령이나 Ctrl + J 단축키를 이용하거나, 트랜스포트 바의 시간 부분을 더블클릭하면 점프 창을 이용해 원하는 특정 시점으로 한 번에 점프해서 이동할 수 있다. 점프할 지점을 입력할 때는 현재 시간선의 단위와 같게 입력해줘야 한다.
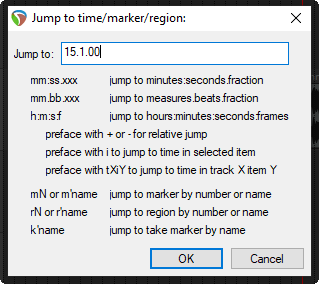
- 특정 지점으로 이동하려면, 그림처럼 지점 값을 입력한다.
- 현재 커서를 기준으로 상대적인 값으로 앞/뒤로 이동하려면, + 또는 – 기호를 앞에 붙인다. 예들 들면 -2.0과 같다.
- 선택된 미디어 항목에서 특정 시점으로 이동할 때는 시점 앞에 i 문자를 붙인다. 예들 들면 i0:30과 같다
2.7. 큰 시계
이건 사실 시계가 아니고 커서의 현재 위치 표시판 같은 것이다. View > Big Clock 명령 또는 Alt + C 단축키를 이용하면 큰 시계 (Big Clock) 컨트롤을 켜고 끌 수 있다. 자유롭게 크기를 바꾸거나 옮기거나 도커에 고정시킬 수도 있다. 큰 시계 창 위에서 마우스 우클릭을 하면 보이기 형식 등의 옵션들을 바꿀 수 있는 컨텍스트 메뉴가 뜬다.

이 아래는 같은 내용을 영문으로 번역한 것임.
The above is a Korean translation of the same below.
2.3. The Transport Bar
If the Transport Bar is not visible, use the View > Transport command to display it, or use the keyboard shortcut Ctrl + Alt + T. The main Transport Controls are shown below, though your exact layout might not be identical.
The four transport buttons are fairly standard – Go to Start, Go to End, Record and Play. After these come Toggle Repeat loop, Stop and Pause. The Stop button stops playback and returns the play cursor to the position it was in when playback started. The Pause button pauses playback without moving the play cursor.
The Record button starts and stops recording, without stopping playback. Clicking on the Stop button when recording will stop both playback and recording. The Toggle Repeat button turns on and off the option for any looped time selection to be played over and over again during playback.
The current play cursor position is also shown, and comes the next is the playback status (Playing, Paused or Stopped).
The current time selection is shown (start position, end position and length) at the first in the 2nd low.
Notice also edit boxes that show Time Signature and the project Tempo (BPM) values. To change the value of either box click in the box and type the new value. Depending on your mouse preferences (see Chapter 22), you can also use your mousewheel to adjust this. The Global Automation Override feature will be explained in Chapter 18. Finally is the playback rate. This can be made faster or slower by adjusting the fader knob. If adjusted, this knob is colored green. Double-clicking resets the rate to 1.0. You can also hover your mouse over the box and use your mousewheel to increase (up) or decrease (down) the value.
Three other useful transport control keys are Ctrl Left (go back a little), Ctrl Right (go forward a little) and Alt Space (play, skipping loop selection.
Tip: Notice the toggle command Continuous scrolling on the Options menu. If disabled (the default), the play cursor will scroll from left to right during playback. If enabled, this cursor will find and then remain stationary in the center of the arrange window during playback, while the media items scroll across the screen.
2.4. Navigation and Zooming
2.4.1. Zooming In and Out from the Main Menu or with Keyboard Shortcuts
Several zoom actions are available on the View, Zoom menu. Keyboard shortcuts are available as follows.
- Zoom in horizontally: + or up arrow.
- Zoom out horizontally: - or down arrow.
- Zoom to time selection: Ctrl Num Pad +
- All tracks to same height and size up: Page Up
- All tracks to same height and size down: Page Down
2.4.2. Scrolling with the Keyboard
The following keyboard shortcuts can be used for scrolling within a project.
- Scroll View down: Alt + Down
- Scroll View up: Alt + Up
- Scroll View left: Alt + Left
- Scroll View right: Alt + Right
2.4.3. Zooming and Scrolling with the Mousewheel
The mousewheel can also be used for zooming in and out when you are navigating a project file.
- Horizontal Zoom: Wheel up or down.
- Horizontal Scroll: Alt + Wheel up or down.
- Vertical Zoom: Ctrl + Wheel up or down.
- Vertical Scroll: Ctrl + Alt + Wheel up or down.
The command Help > Keybindings and mouse modifiers (Shift + F1) will open your web browser with a list of REAPER's mouse modifiers and keyboard shortcuts. As you will see in Chapter 15, you can also define your own mouse modifiers, keyboard shortcuts and action keys, so as better to suit your own workflow.
2.5. Using the Navigator
The REAPER Navigator shows an overview of your project. It can be zoomed in or out to display a selected area area of your project. To display the Navigator, choose the View > Navigator command. Use Ctrl + Alt + V to toggle the Navigator display on and off.
Simply position the mouse over the box within the navigator window that represents the on-screen area of your project. Then hold down the left mouse button, and click and drag to scroll the display. Release the mouse button when finished. Other ways of using the Navigator are as below.
- Define area to display: Right + drag
- Reposition display area: Left click
- Zoom in/out tracks only: Alt + right drag
- Zoom in/out time only: Ctrl + right drag
- Move display area: Left drag
- Move play area and cursor: Ctrl + left click
2.6. Navigating by Jumping
You can jump to any point on the timeline using the View > Go to > Jump to... command or the keyboard shortcut Ctrl + J, or double-clicking on the time on the transport bar. In typing the place to jump to you should use the same format as the timeline.
- To jump to an absolute position in a project, simply enter the required position as in the picture shown.
- To jump forward or back relative to the current cursor position, enter a + or – followed by a value – e.g. -2.0
- To jump to a specific time in an item, type I followed by the time, e.g. i0:30
2.7. The Big Clock
This is actually not a clock but a displaying board of the Edit Cursor's current position . Use the View > Big Clock command or press Alt + C to toggle on and off the display of the Big Clock. This window can be sized and moved at will, or docked in the docker. Right clicking over the Big Clock gives you a context menu of options, including changing the display format.
'오락과 여흥 > Reaper (리퍼)' 카테고리의 다른 글
| 리퍼 사용자 가이드 - 2-4. FX 기초 1 (1) | 2023.11.04 |
|---|---|
| 리퍼 사용자 가이드 - 2-3. 트랙 관리와 컨트롤 (0) | 2023.11.03 |
| 리퍼 사용자 가이드 - 2-1. 프로젝트 설정 (0) | 2023.11.02 |
| 리퍼 사용자 가이드 - 1-3. 기본설정 (1) | 2023.11.02 |
| 리퍼 사용자 가이드 - 1-2. 시작하기, 화면구성 (0) | 2023.10.24 |


댓글