
이번 장에서는 리퍼 프로젝트 파일에 대한 기본적 내용을 다룰 것이다. 파일들을 열고 닫고, 리퍼 작업 환경을 탐색하고, 트랙과 오디오 이펙트들을 다루는 등의 내용을 다룰 것이다. 이 설명서 전반에 사용될 예제 프로젝트는 All Through The Night이며, 여기에 첨부해 놓는다.
2.0. SWS 익스텐션
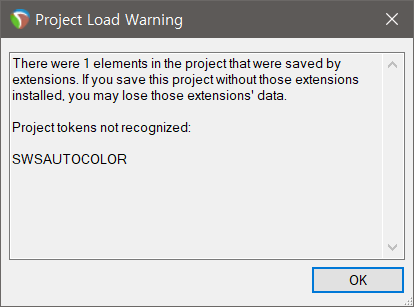
All Through The Night 데모 프로젝트를 열면 Project Load Warnng 대화상자가 뜨게 된다. 이것은 데모 프로젝트가 SWSAUTOCOLOR 익스텐션 기능을 요구하는데, 아직 이 익스텐션이 설치가 되어있지 않아서이다. 따라서 여기서 SWS 익스텐션을 설치할 필요가 있다.
리퍼의 화면은 강력한 기능을 제공하지만 무료 익스텐션인 SWS 패키지는 더 많은 기능을 제공한다. 또한 리퍼에 대해서 더 많이 알아갈수록 자주 사용하게 되는 편집 등의 액션들이 많아질 것이다. 이런 기능들 중 상당수가 SWS 익스텐션에 있다. 이 익스텐션을 설치하려면, 다음 과정을 따른다.
1. SWS 익스텐션 사이트로 간다.
2. 설명을 읽어보고 자신에게 맞는 버전을 다운로드한다.
3. 다운로드 후 프로그램을 실행해서 설치한다. 그리고는 정상적으로 리퍼를 시작하면 된다.
2.1. 기존 프로젝트 열기
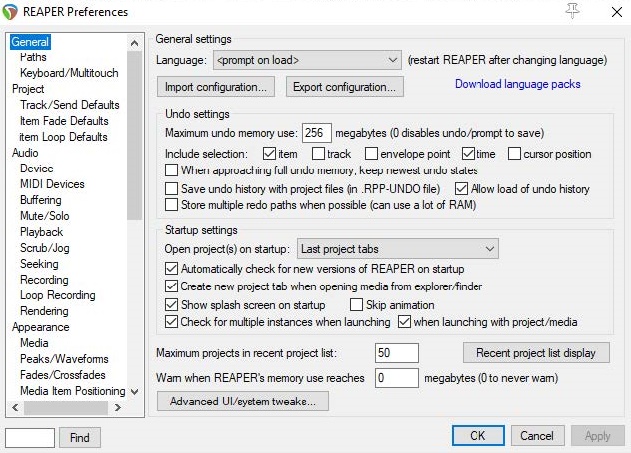
기존 프로젝트 파일을 열려면 File > Open Project 명령 또는 단축키 Ctrl + O를 이용한다. 최근 작업했던 프로젝트들은 File > Recent Projects 명령을 이용한다. 설정에 따라 최대 100개까지 최근 작업했던 프로젝트 파일들을 볼 수 있다. Options > Preferences 창의 General 항목을 선택하면 프로젝트 관련해서 몇 가지 설정들을 볼 수 있다.
● 작업취소(Undo) 옵션 관리.
● 리퍼를 시작할 때 자동으로 가장 최근 작업 파일들을 열 것인지 여부. Last active project 옵션이 이에 해당된다. 다른 시작 옵션들은 22장 참고.
● 리퍼를 시작할 때 자동으로 새 버전을 확인할지 여부.
● 최근 작업했던 프로젝트 목록의 갯수.
General 설정에 대한 다른 항목들은 22장에서 다룬다.
화면 관련 팁: 리퍼 화면의 텍스트가 너무 작다고 느껴진다면, 이 부분에서 바꿔 줄 수 있다. General 화면의 아래쪽에 있는 Advanced UI/system tweaks... 단추를 클릭하고, 대화창에서 check Scale UI elements... 옵션을 활성화 시킨 후, 그 값을 1.25나 1.5 등 1보다 더 큰 값으로 변경하고, OK 단추를 선택한다. 커진 텍스트 크기에 따라 리퍼의 여러 화면 설정들을 다시 조정해줘야 할 수도 있다.
2.2. 리퍼 파일 종류
새 프로젝트를 저장하면 리퍼는 작업 내용들을 담을 몇 가지 파일들을 생성한다. 몇 가지 중요 파일들은 아래와 같다.
.RPP: 리퍼 프로젝트 파일. 프로젝트의 핵심 파일이다. 트랙, 미디어, 설정 등의 정보를 담고 있으며, 단순 텍스트 파일이다.
.RPP-bak: 프로젝트 백업 파일. 기존 프로젝트를 다시 저장할 때 기존 내용이 .RPP-bak 확장자로 따로 저장된다. 이 백업 파일을 열면 이전의 프로젝트 상태를 복구할 수 있다.
.RPP-UNDO: 언두 히스토리 파일. Options > Preferences 창에서 General 항목을 선택하고, Undo Settings 섹션에서 Save undo history with your project files 옵션을 켜면 이 파일이 생성된다.
.reapeaks: 리퍼 피크 (Peaks) 파일. 리퍼가 미디어 파형을 그리기 위한 정보를 담고 있다.
.reapindex: 리퍼 인덱스 파일. 각 미디어 항목들의 인덱스 정보를 담고 있다.
2.2. 프로젝트 설정
리퍼 프로젝트 설정이란 프로젝트 별로 필요한 요구사항을 지정하는 것이다. 프로젝트 설정 대화상자는 File > Project Settings 메뉴를 이용하거나 단축키 Alt + Enter를 통해서 열 수 있다. 설정 창을 열면 Project Settings, Media, Video, Advanced 그리고 Notes 다섯 가지 설정 탭이 있다. 잘 모르겠거든 대부분 기본 값을 그대로 두는 것도 좋다.
2.2.1. Project Settings: Project Settings
이 탭에는 아래와 같은 옵션들을 지정할 수 있다.
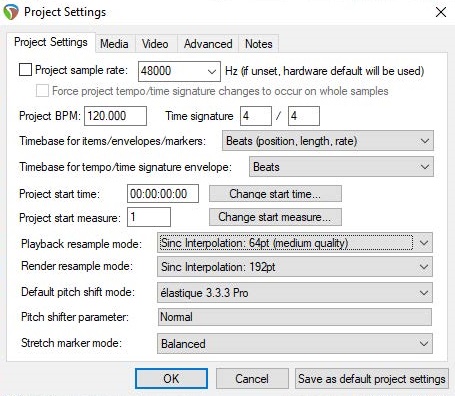
● 프로젝트 샘플 레이트. 가령 CD 음질 표준인 44100 Hz 또는 DVD 음질 표준인 48000 Hz 등의 값을 지정할 수 있다.
● 프로젝트의 빠르기(BPM)나 박자표를 지정한다.
● 프로젝트 타임 베이스 설정. 아래 내용을 참고한다.
● 프로젝트이 시작 시간 또는 박자. 당장은 기본값으로 둔다. 언제, 왜, 그리고 어떻게 이것을 변경하는지 12장에서 다룬다.
● 기본 타임라인 눈금선의 시작 박자. 기본값은 첫 박자로 되어있다.
● 재생 또는 랜더링에서 리샘플 모드. 가장 낮은 point sampling에서 중간 수준의 64 Sinc, 최고 수준의 768 HQ Sinc까지 다양한 옵션들이 있다.
● 음정 조정과 늘이기 마커의 기본 모드. 10장을 참고한다.
2.2.1.1. 프로젝트 타임 베이스 (Timebase) 설정
프로젝트의 타임 베이스란 프로젝트 템포를 변경할 때 미디어, 파형, 마커 등이 어떻게 변할지를 조절한다. 가급적, 뭔가 녹음하거나 오디오를 불러들이기 전에 미리 프로젝트 타임 베이스를 맞게 설정해두는 것이 좋다.
● Beats (position, length, rate): 프로젝트 요소들의 시작 지점이나 길이 등이 박자에 맞게 고정된다. 즉 템포를 빠르게 변경하면 미디어 항목도 빠르게 연주되도록 바뀌고, 반대로 느려지면 미디어도 느리게 연주되도록 바뀐다.
● Beats (position only): 프로젝트 요소들의 시작 지점만 박자에 맞춰 고정되고, 미디어 항목들의 연주 시간이 고정된다.
● Time: 프로젝트 요소들의 시작지점과 길이 모두 시간에 맞춰 고정된다. 즉 템포가 변하게 되면 그 박자로 볼 때 시작 지점과 연주 길이가 다 달라지게 된다.
2.2.2. Project Settings: Media
이 탭에는 아래와 같은 옵션들이 포함된다.
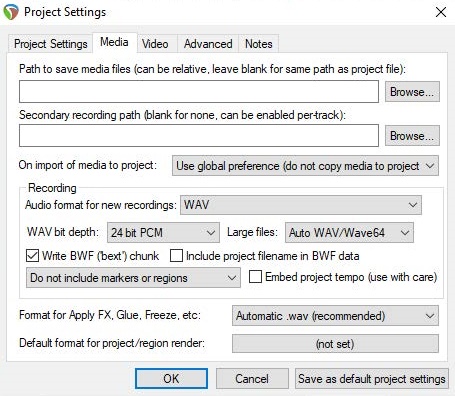
● 미디어 파일을 저장할 기본, 2차 경로. 예를 들어 “Media”라고 설정하면 이후 미디어 파일들은 Media라는 이름의 프로젝트 하위 폴더에 저장되게 된다.
● 미디어를 불러들일 때 프로젝트 파일 폴더 내에 복사본을 만들지에 대한 글로벌 설정을 프로젝트 별로 다시 지정한다.
● 녹음 파일 포멧. 일반적으로 WAV 또는 MP3를 이용하지만, AIFF, DDP, FLAC, OGG Vorbis Video (GIF) 그리고 WavPack 형식도 지원한다.
● 위에서 녹음 파일 형식을 정하면 그에 따른 세부 설정들을 지정한다. 예를들어 WAV 파일에는 Bit Depth 등을 지정할 수 있다.
● FX를 설정하거나, 항목들을 붙이거나 오디오 파일로 랜더링해서 합칠 때 기본 파일 포멧.
● 프로젝트와 영역에 대한 기본 미디어 포멧. 녹음 포멧과 같게 할 수 있다.
2.2.3. Project Settings: Video
이 부분은 20장에서 다룬다.
2.2.4. Project Settings: Advanced
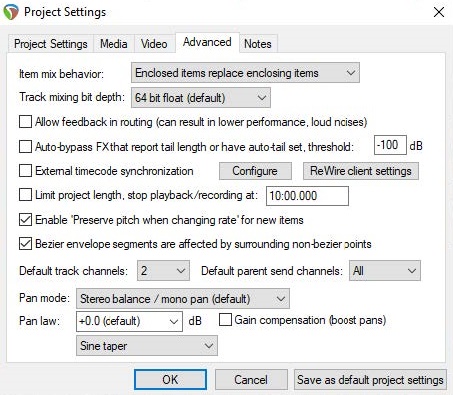
● Item Mix Behavior. 미디어 항목들이 겹칠 때 처리 방법을 결정한다. 밑에 깔린 것이 덮은 것을 대체하거나, 둘이 섞이거나, 또는 새 항목이 이전 것을 대체하도록 설정할 수 있다.
● Track mixing depth. 잘 모르겠다면 우선 기본값으로 둔다.
● 피드백을 라우팅할지 여부. 특정한 경우에는 피드백 라우팅이 유용하겠지만, 오디오 장비에 피해를 줄 가능성이 있다. 잘 모르겠다면 이 옵션을 활성화하지 않는다.
● Auto-bypass FX that report tail length or have autotail set ... threshold. 여기서 설정된 데시벨 이하에서는 FX를 바이패스 하도록 한다.
● 외부 장치의 타임 코드에 맞춰 프로젝트를 동기화하도록 설정.
● 프로젝트 길이와 녹음 시간의 최대 길이 제한, 그리고 연주 속도 변경시에 음정을 보정할지 여부.
● 트랙 채널과 부모 샌드 채널의 기본 수 (최대 128개).
● 기본 패닝 규칙(pan law). 패닝 규칙은 트랙이 좌우 어느 한쪽으로 더 치우치도록 조절할 때 상대적인 음량 변화를 조절한다. 게인 보상 부스트를 주거나 끌 수 있다. 패닝 규칙에 대해서는 이 장의 뒤에서 더 다룬다.
● 기본 패닝 모드. 모노 또는 스테레오로 선택할 수 있는데, 11장을 참고하라.
2.2.5. Project Settings: Notes
여기에서 프로젝트에 메모나 설명글을 적을 수 있다. 자동 줄바꿈을 하거나 프로젝트를 열 때 자동으로 메모가 보이도록 할 수 있다. Title과 Author 항목에 저장된 내용은 랜더링할 때 $title이나 $author 와일드카드로 메타데이터에 넣을 수 있다.
팁: Save as defaults project settings 단추를 이용해 여기에서 설정한 것들을 앞으로 프로젝트를 만들 때 기본값으로 사용하도록 지정할 수 있다. 또한 각 프로젝트에서 별도로 설정해서 이 기본값을 덮어쓸 수도 있다.
이 아래는 같은 내용을 영문으로 번역한 것임.
The above is a Korean translation of the same below.
In this chapter you will be taught the basic essentials of working with a project file in REAPER. Topics include opening and closing files, navigating the REAPER environment, working with tracks and audio effects, and more. The examples used throughout this guide use the project file All Through The Night.RPP. This can be downloaded from here.
2.0. SWS Extensions
When you open the All Through The Night demo project, Project Load Warnng dialog box will pop up. It's because that the demo require the SWSAUTOCOLOR extension but you don't have. So you need to install the SWS extension at this stage.
REAPER’s screen sets are powerful, but the optional free SWS Extensions package adds even more functionality. Also, as you get to know REAPER better you will find that there are a number of editing and related actions that you will want to use frequently. You will find that many of these actions – and more - are available by downloading and installing the SWS Extensions Pack. To do this, you simply follow this sequence:
1. Go to SWS extension site.
2. Follow the instructions to download the correct version for your operating system.
3. After downloading, run the install program, then start REAPER in the usual way.
2.1. Opening an Existing Project
To open an existing REAPER Project File, use the File > Open Project command, or the keyboard shortcut Ctrl + O. Recently used projects can more easily be opened using the File > Recent Projects command. This causes a list of up to the last 100 recently used project files to be displayed. The General page of your Options > Preferences window offers a number of options. In particular, you can:
● Manage your Undo preferences.
● Specify whether or not you want the most recently used file automatically loaded when REAPER is started. Choose the Last active project option for this. Other startup options are explained in Chapter 22.
● Specify whether you want to Automatically Check for New Versions of REAPER on Startup.
● Determine the number of files displayed on the Recent project list.
Other General Preferences settings are discussed and explained in Chapter 22.
Tip: If you feel for REAPER's UI text, then you can change in this section. At the bottom of General screen, click on Advanced UI/system tweaks.... and check Scale UI elements... and change the 1 to 1.25 or 1.5 or larger number and click OK button. You may need to rearrange your screen as the change of text size.
2.2. REAPER File Types
When you save the project, REAPER creates a series of files that it uses to store your work. Some of the main file types and their purposes are described below.
.RPP: REAPER Project File. This file is the core of your project. It holds all the information about your tracks, your media and their settings and is a text file.
.RPP-bak: Project Backup File. When you save an existing project file, the previous version is saved with the .RPP-bak extension. You can recover a project from its previous state by opening the backup file.
.RPP-UNDO: Undo History File.This file type will be created if the option of Save undo history with your project files is enabled in the Undo Settings section of the General section in your Options, Preferences window.
.reapeaks: REAPER Peaks File. These files contain the information necessary to enable REAPER to draw the waveforms etc. on your media items.
.reapindex: REAPER Index File. These files contain index information about your individual media items.
2.2. Project Settings
REAPER project settings can be defined to meet the requirements of individual projects. The Project Settings dialog box is accessed by choosing the File > Project Settings command, or by pressing Alt + Enter. There are five pages of settings - Project Settings, Media, Video, Advanced and Notes. If in doubt, most settings should be left at their default values.
2.2.1. Project Settings: Project Settings
These include:
● Project Sample Rate. You can set this, for example, 44100 Hz for CD standard or 48000 Hz for DVD standard.
● Project beats per minute and time signature.
● The Project Timebase Settings. See the below.
● Project start time and measure. Leave these at their defaults for now. In Chapter 12 you'll see when, why and how to change them.
● Base ruler markings off any specified start measure. The default is the first.
● Playback and render resample mode. There are options from Lowest (point sampling) thru Medium (64 Sinc) to Extreme HQ (768 HQ Sinc).
● Default modes and parameter to be used for pitch shifting and stretch markers. See Chapter 10.
2.2.1.1. The Project Timebase Settings
The project timebase controls how media items, envelopes and project markers behave when project tempo changes. When possible, get your project timebase settings right before you record or import any items.
● Beats (position, length, rate): Project elements will keep their position and length constant as measured in beats. Media item playback rate will speed up if the tempo is increased, or slow down if the tempo is decreased.
● Beats (position only): Project elements will keep their position constant as measured in beats, but media item length will remain constant as measured in seconds.
● Time: Project elements will keep their position and length constant as measured in seconds. Positions and media item length will change as measured in beats, if the tempo is changed.
2.2.2. Project Settings: Media
These include:
● Primary and secondary Paths to store media files. For example, if you specify “Media” then your media will be stored in a folder called Media, as a sub-folder of the project folder. If left blank, REAPER will use the project file folder.
● Option to use or over-ride the global preference for copy media on import to the project file folder.
● Recording format. Typically WAV or MP3, but there are others, e.g. AIFF, DDP, FLAC, OGG Vorbis Video (GIF) and WavPack.
● Settings and specifications for chosen recording format – e.g. for WAV files this includes Bit Depth.
● Preferred media formats when FX are applied, or items are glued or frozen, and when media items are rendered.
● Default media format for project and regions. You have the same range of formats, options and settings as you have for recording format.
2.2.3. Project Settings: Video
These are explained in Chapter 20.
2.2.4. Project Settings: Advanced
● Item Mix Behavior. Determines behavior when one media item is placed on top of another. Options are for enclosed items to replace enclosing items, items always to be mixed, or for the newer item to replace older item.
● Track mixing depth. If unsure, leave at the default setting.
● The option to allow feedback in routing. Feedback routing can in some instances be useful, but can risk damage to audio equipment. If in doubt, do not select this option.
● Auto-bypass FX that report tail length or have autotail set ... threshold. Establishes dB floor below which a FX where this option has been enabled should be bypassed.
● The option to synchronize project with an external device timecode.
● There are options to limit project length and recording time, also to set the default state for Preserve pitch when changing rate.
● Default number of track channels and parent send channels for new projects (up to 128).
● Specifying a default pan law for your tracks. The pan law determines how the relative track volume behaves when that track is panned more or less to one side or the other. Gain compensation boost can be enabled or disabled. Pan laws are discussed in more depth later in Chapter 2.
● Default track pan mode. You have choice of pan modes, some mono, some stereo. See Chapter 11.
2.2.5. Project Settings: Notes
Here you can enter notes and comments to be included with your project file. There are options for automatic word wrap and to specify that the notes should automatically be displayed each time the project is opened. Text saved as the Title or Author can be used with the $title or $author wildcards as metadata when rendering.
Tip: You can save all these settings as the defaults to be used for future new projects. Of course, for any individual projects you can over-write your defaults.
'오락과 여흥 > Reaper (리퍼)' 카테고리의 다른 글
| 리퍼 사용자 가이드 - 2-3. 트랙 관리와 컨트롤 (0) | 2023.11.03 |
|---|---|
| 리퍼 사용자 가이드 - 2-2. 재생, 내비게이션 (1) | 2023.11.03 |
| 리퍼 사용자 가이드 - 1-3. 기본설정 (1) | 2023.11.02 |
| 리퍼 사용자 가이드 - 1-2. 시작하기, 화면구성 (0) | 2023.10.24 |
| 리퍼 사용자 가이드 - 1-1. 설치, 업데이트, 제거 (1) | 2023.10.13 |


댓글