
1.9. 리퍼 시작하기
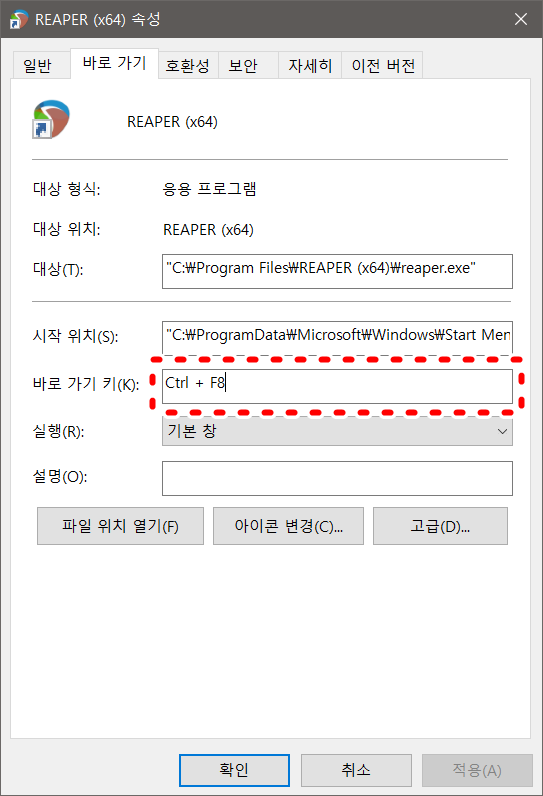
바탕화면에서 아이콘을 더블클릭해서 리퍼를 시작한다. 이 과정도 단축키로 지정할 수 있는데, 바탕화면 아이콘의 속성 창을 열고 바로 가기 탭의 바로 가기 키(K)에 등록시킬 수 있다 (윈도우 10).
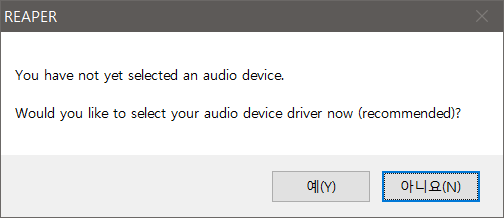
'select your audio device' 창이 나타나면, 여기서는 일단 No를 선택한다.
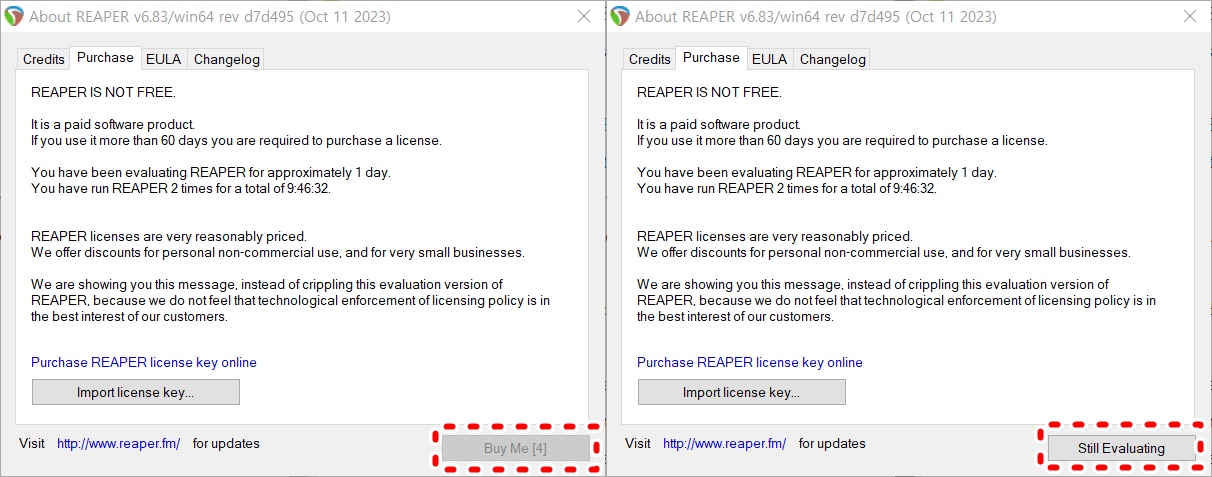
Purchases 창이 보이면 대략 5초 정도를 기다려, Still Evaluating 단추가 활성화된 후 이걸 클릭한다.
1.10. 리퍼 화면 설명
리퍼가 시작되면 아래와 비슷한 (그러나 같지는 않은) 화면이 나타난다. 아래 그림은 아주 간단한 프로젝트 파일을 열었을 경우의 예시이다.
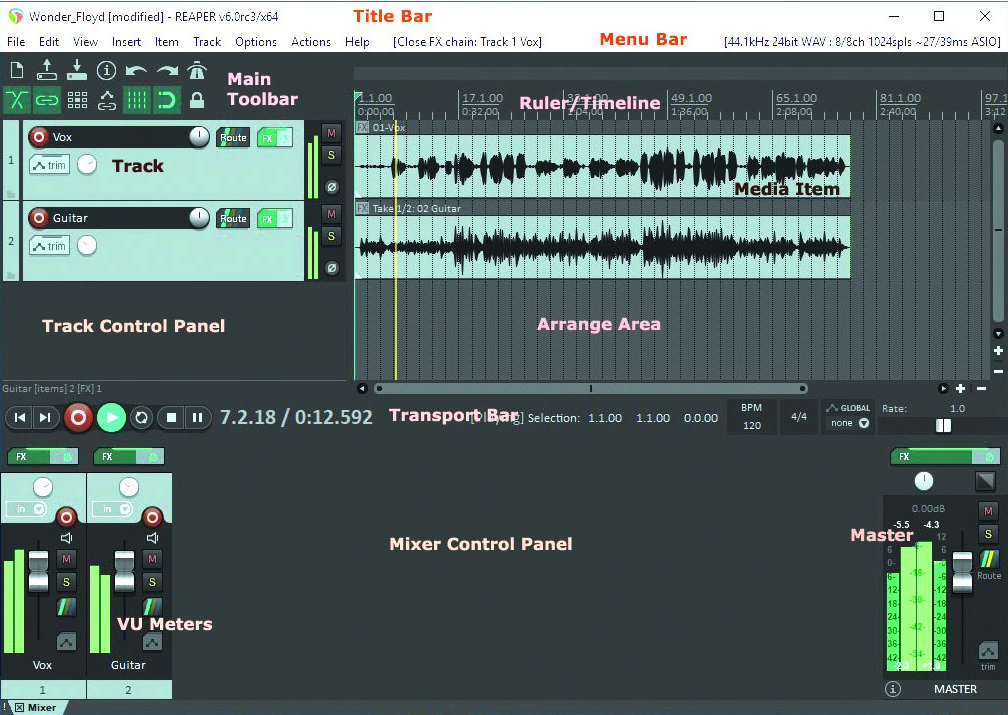
1.10.1. The Menu Bar
거의 맨 위에는 메인 메뉴가 보인다. 다른 애플리케이션들에서 처럼 메뉴는 명령(commands)을 실행한다.
1.10.2. The Main Toolbar
메뉴바 바로 아래에는 7개의 단추들이 있는 메인 툴바가 있다. 다른 프로그램들에서 처럼, 각 단추 위에 마우스 커서를 올려 놓으면 설명글(tooltip)이 나타난다. 이 프로그램에서 사용되는 다양한 아이콘들에 대해서는 5장 말미에 설명될 것이다. 15장에서는 툴바 커스터마이징 방법을 보게 될 것이다.
1.10.3. The Ruler/Timeline
리퍼 창의 윗부분, 메인 툴바 옆에는 타임라인(또는 눈금선)이 가로로 길게 나타난다. 프로젝트 전체 길이를 재거나, 프로젝터 내에서 여러 미디어 항목들의 위치를 파악하는데 도움이 된다.
1.10.4. The Track Control Panel (TCP)
트랙 제어판은 오디오나 미디 트랙을 제어하는 부분이다. 리퍼에서는 필요한 만큼 얼마든지 트랙을 만들 수 있는데, 가지고 있는 하드웨어의 성능만이 문제가 된다. 각 트랙은 각자의 콘트롤(페이더, 로터리, 단추 등)들을 가진다. 트랙 컨트롤들은 2장에서 다룬다.
1.10.5. Arrange Area: Main Window and Workplace
TCP 바로 오른쪽에는 편곡 영역(Arrange Area)이 있다. 각 트랙의 미디어 항목들(오디오, 미디, 비디오 등)을 보여주게 된다.
1.10.6. The VU Meters
각 트랙과 마스터는 볼륨 단위 미터(Volume Unit Meters, VU Meters)를 통해서 볼륨 수준을 표시한다. VU 미터는 TCP와 믹서 양쪽에 다 표시된다.
1.10.7. The Transport Bar
구동기(Transport Bar)는 녹음과 재생 기능을 제어한다. 2장에서 더 살펴본다.
1.10.8. The Mixer and Mixer Control Panel (MCP)
화면 아래쪽에는 믹서와 믹서 제어판이 있다. 여기에서 보이는 것은 TCP에 있는 트랙들을 다르게 보여주는 것일 뿐이다.
MCP에서는 마스터 출력 트랙이 추가로 보인다. 마스터 트랙의 출력이 트랙들의 미디어 항목들이 재생될 때 실제로 듣게 되는 것이다. 믹서와 마스터의 표시 옵션들은 11장에서 다룬다.
1.11. 사용권 정보
리퍼의 타이틀바에는 등록된 사용자 이름 등의 사용권 정보가 기본적으로 표시된다. 사용권 구매 관련 사항을 다루려면 Help 메뉴의 License and user agreement (버전 7.x 에서는 Purchasing information) 명령을 선택한다. 좀 다른 식으로는, 전체 화면 모드를 사용하는 방법이 있다. 윈도우에서는 F11 키를 이용해서 전체 화면 모드에 진입하거나 빠져나올 수 있고, OS/X에서는 Cmd + F11 키가 이용된다.
1.12. 리퍼 선택하기, 콘트롤, 명령 처리
리퍼에서 작업을 한다는 것은 어떤 것을 선택하고 명령을 내리는 과정이다. 리퍼에서는 보통 4가지 방법이 사용된다.
1.12.1. 메인 메뉴
다른 애플리케이션처럼 마우스나 키보드로 접근이 가능하다.
1.12.2. 컨텍스트 메뉴
특정 항목 또는 영역에서 마우스 오른쪽 단추를 클릭하고 관련된 명령을 선택한다.
1.12.3. 툴바
툴바 단추를 마우스로 클릭해서 실행한다.
1.12.4. 키보드 단축키
많은 명령과 액션들은 키보드 단축키로 접근 가능하다. 또한 자신만의 단축키를 지정할 수도 있는데, 15장에서 이를 다룬다.
PC와 맥에서는 다른 한정 키가 사용되기도 한다. 이 문서는 윈도우 단축키만을 다루는데, 맥 사용자는 아래 요약 표를 참고하기 바란다.
| PC (Windows) Key | Mac (MacOS) Key Equivalent |
| Shift | Shift |
| Control (Ctrl) | Command (Cmd) |
| Alt | Option |
| Windows | Control |
1.13. 리퍼 시작 관련 팁
만약 리퍼가 오류를 뿜어내면서 시작되질 못한다면 써드파티 플러그인 관련 문제일 가능성이 크다. 그럴 때는 아래 방법들을 시도해 보자. 아래 보조키들은 마우스 클릭과 함께 사용할 수도 있고, 단축키와 함께 이용할 수도 있다.
Shift: 마지막으로 열었던 프로젝트를 열지 않고 리퍼를 시작한다.
Ctrl + Shift: 기본 프로젝트 템플릿을 로딩하지 않고 리퍼를 시작한다.
Ctrl: 새로 VST 플러그인을 스캔하지 않고 리퍼를 시작한다.
1.14. 리퍼 시작 메뉴 (윈도우)
윈도우 시작 메뉴에는 리퍼를 시작하는 다른 옵션들도 있다. 윈도우 시작 아이콘을 클릭하고 프로그램 목록에서 REAPER 또는 REAPER x64 항목을 선택하면 몇 가지 선택 메뉴들이 있다.
ReaMote Client: ReaMote 사용에 관해서는 이 문서의 범위를 넘어가는 주제이지만, 23장에서 간략하게 다룬다.
REAPER: 마지막으로 작업했던 프로젝트를 열며 정상적으로 리퍼를 시작한다.
REAPER (create new project): 새 프로젝트로 리퍼를 시작한다.
REAPER (reset configuration to factory defaults): 모든 설정 변경을 초기화하고 리퍼를 시작한다. 이 옵션은 주의해서 사용해야 한다!
REAPER (ReWire client mode): ReWire 클라이언트 모드로 리퍼를 시작한다. 이 또한 이 문서의 범위를 넘어가는 주제이지만 17장 말미에 간략하게 다룬다.
REAPER (show audio configuration on startup): 오디오 설정 창을 열며 리퍼를 시작한다.
REAPER EULA: 사용권 정보를 표시한다.
Uninstall REAPER: 리퍼를 제거한다.
이 아래는 같은 내용을 영문으로 번역한 것임.
The above is a Korean translation of the same below.
1.9. Starting REAPER
To start REAPER, just double click on the REAPER desktop icon. If you wish to create a keyboard shortcut for this, you can register the shortcut key in the Shortcut Key box in the Shortcut tab of the icon's Properties window (for Windows 10).
If you are prompted to select your audio device, in this case select No.
When Purchases window appears, wait about 5 seconds, and select the Still Evaluating button.
1.10. The REAPER Screen
When you start REAPER, it displays a screen similar (but not identical) to that shown below. The example shows a very simple project file that has been opened.
1.10.1. The Menu Bar
This displays the Main Menu near the top. As in other applications, the menu is used to give commands.
1.10.2. The Main Toolbar
Just below the menu are two rows of seven buttons. This is the REAPER Main Toolbar. As with other programs, you can hover your mouse over any button to obtain a tooltip. The various icons are summarized at the end of Chapter 5. In Chapter 15 you will be shown how you can customize this toolbar.
1.10.3. The Ruler/Timeline
The timeline (or ruler) runs across the top of the REAPER window, to the right of the main toolbar. It measures the length of your project and helps you identify the position of the various media items.
1.10.4. The Track Control Panel (TCP)
This area controls the behavior of audio and MIDI tracks. You can have as many tracks as you need, subject only to any limitations imposed by your hardware. Each track has its own set of controls (faders, rotaries and buttons). We'll get to what these controls do in Chapter 2.
1.10.5. The Arrange Area: Main Window and Workplace
This is to the right of the TCP. It contains thel track's media items (audio/MIDI/video).
1.10.6. The VU Meters
Each track and the Master uses Volume Unit Meters (VU Meters) as a visual indicator of the level of the volume. These are visible in both the TCP and the Mixer.
1.10.7. The Transport Bar
This is used to control recording and playback. We'll look at this in Chapter 2.
1.10.8. The Mixer and Mixer Control Panel (MCP)
This is displayed across the bottom of the screen. It shows your tracks in a different way, but they are the same tracks as is shown in the TCP.
Notice that this also includes a Master output track. The output of the Master is what you actually hear when you play your tracks and media items. The Mixer and Master display options will be explored in detail in Chapter 11.
1.11. User License Information
By default, REAPER's title bar will display license information such as the name of the registered user. There are options to manage this on the Purchase tab of the window that is opened when you choose the Help, License and user agreement (in ver. 7.x Purchasing information) command. Alternately, you can set your display to full screen mode. This is toggled on and off in Windows by pressing F11, in OS/X by Cmd F11.
1.12. REAPER Selections, Controls and Commands
Working in REAPER involves making selections and giving commands. There are 4 main methods commonly used to give commands in REAPER
1.12.1. The Main Menu
As with other applications, this is accessed by the mouse or keyboard.
1.12.2. Context Menus
Click your right mouse button over an item or area of the screen to display a context menu relevant to where you have clicked.
1.12.3. Toolbars
Click your mouse on any toolbar button for its command to be executed.
1.12.4. Keyboard Shortcuts
Many commands and actions can be accessed by keyboard shortcuts. You can also assign your own shortcuts and Chapter 15 explains this.
In some cases, different modifier keys are used for the PC and for the Mac. The examples used throughout this guide are PC (Windows) shortcuts. Mac users should refer to the summary table of similarities and differences shown below.
| PC (Windows) Key | Mac (MacOS) Key Equivalent |
| Shift | Shift |
| Control (Ctrl) | Command (Cmd) |
| Alt | Option |
| Windows | Control |
1.13. REAPER Startup Tips
You can change this behavior. If REAPER fails to open but instead returns an error, this is most likely because of an issue with a third party plug-in. Try opening it using either of the methods described below. You can use clicking or hot keys with additional keys described below.
Shift: Open REAPER without loading last project.
Ctrl + Shift: Open REAPER without loading any default project template.
Ctrl: Open REAPER without scanning new/updated VST plugins.
1.14. REAPER Start Menu Options (Windows only)
There are other options with starting REAPER in the Windows Start menu. Click on the Start button, then All Programs then REAPER (or REAPER x64) to be presented with a flyout menu of choices:
ReaMote Client: The use of ReaMote is beyond the scope of this User Guide. However, you can read an overview in Chapter 23.
REAPER: Starts REAPER normally, with last project.
REAPER (create new project): Starts REAPER with a new project file.
REAPER (reset configuration to factory defaults): Starts REAPER and resets all settings, options and preferences to factory defaults. Use this with caution!
REAPER (ReWire client mode): Opens REAPER as a ReWire client. This is beyond the scope of this User Guide, but is discussed in overview towards the end of Chapter 17.
REAPER (show audio configuration on startup): Starts REAPER with the Audio settings Preferences page.
REAPER EULA: Displays License information.
Uninstall REAPER: Uninstalls REAPER.
'오락과 여흥 > Reaper (리퍼)' 카테고리의 다른 글
| 리퍼 사용자 가이드 - 2-2. 재생, 내비게이션 (1) | 2023.11.03 |
|---|---|
| 리퍼 사용자 가이드 - 2-1. 프로젝트 설정 (0) | 2023.11.02 |
| 리퍼 사용자 가이드 - 1-3. 기본설정 (1) | 2023.11.02 |
| 리퍼 사용자 가이드 - 1-1. 설치, 업데이트, 제거 (1) | 2023.10.13 |
| 리퍼 사용자 가이드 - 0. 요약 번역을 시작하며(목차 포함)... (2) | 2023.10.11 |


댓글