
1.1. 리퍼 다운로드
리퍼를 설치하기 위해 우선 공식 홈페이지에서 설치 파일을 다운로드 한다.
1.2. 맥 OS에 리퍼 설치하기
여기서는 윈도우 10 설치 과정만 다룬다. 맥 OS 설치 과정은 공식 설명서를 참고한다.
1.3. 윈도우 PC에 리퍼 설치하기
1. 설치 파일을 찾는다.
2. 더블 클릭 등으로 설치 과정을 시작한다.
3. I Agree 단추를 클릭한다.
4. 보통의 설치 과정이라면 기본 제공 폴더를 그대로 선택한다. 그 외에 아래 노트를 참고한다.
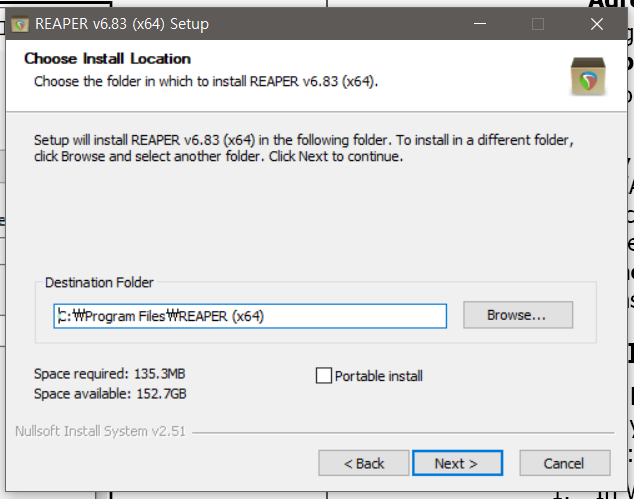
5. 필요하다면 Portable install 옵션을 선택하고 Next 단추를 클릭한다. 관련해서 아래 노트를 참고한다.
6. 모든 설치 요소들을 다 선택한다. 리퍼는 아주 가볍고 작다. Install 단추를 클릭한다.
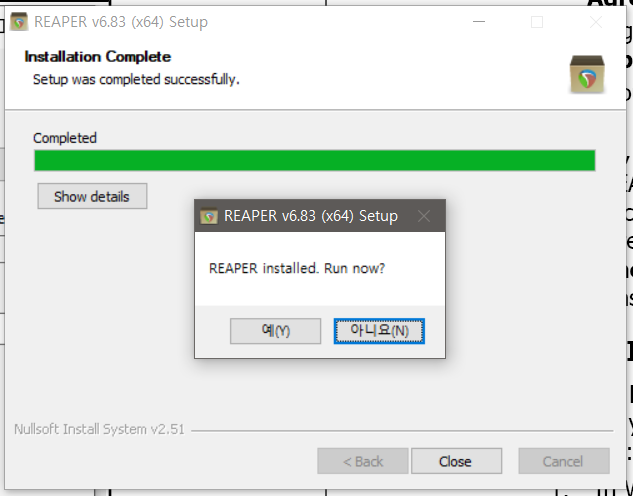
7. 설치 과정이 끝나길 기다린 후, Close 단추를 누른다. 다시, 바로 프로그램을 시작할 지 묻는데, 여기서는 No를 선택한다.
노트: 만약 리퍼를 처음 설치하거나, 기존 설치된 버전을 새 버전으로 덮어쓰려면 Portable install 옵션을 선택하면 안된다. 반면에, 기존에 설치된 구 버전과 함께 새 버전도 따로 설치해서 쓰고자 한다면, 설치 폴더도 바꿔주고 Portable install 옵션도 선택해줘야 한다. 이렇게 해야 기존 설치된 버전의 설정 등을 보존하면서 새 버전을 사용할 수 있다.
1.4. 설치 옵션들 (윈도우 한정)
아래는 설치 옵션들에 대한 간략한 설명이다.
1.4.1. Optional Functionality
JSFX library: 광범위한 오디오 미디 이펙트들.
VST/x64 VST bridging/firewalling: VST 플러그인을 사용시 뛰어난 유연성을 위한 옵션들.
ReaMote, ReWire, ReaRoute: 리퍼와 다른 프로그램들 사이에서 오디오/미디 자료들을 보내고 제어하는 등의 고급 라우팅 기능을 위한 옵션들.
Configure Windows to save REAPER crash dumps: 리퍼가 충돌할 때 진단 정보를 저장하기 위한 옵션.
1.4.2. Desktop Icon
바로가기 아이콘 설치 옵션.
1.4.3. Start Menu Shortcuts:
윈도우 시작 메뉴에 리퍼가 등록되기 위한 옵션.
1.4.4. Associate with RPP Files:
.rpp 파일 (REAPER 프로젝트 파일)을 리퍼 프로그램과 연결하는 옵션.
1.5. 설치된 리퍼 폴더들과 파일들 위치
리퍼의 다양한 리소스들이 설치되는 위치는 운영체제가 OS X인지 윈도우인지, 그리고 버전에 따라 달라질 수 있다.
1.5.1. 레지스트리 (윈도우의 경우)
리퍼는 윈도우 레지스트리에 아무것도 쓰지 않는다. 윈도우는 HKEY_ LOCAL_MACHINE > Software 아래에 REAPER 키를 만들어 놓지만, MUICache나 파일 연결 정보 등을 관리하기 위한 데이터 외에 아무 정보도 포함하지 않는다.
1.5.2. 리퍼 설치 디렉토리
기본적으로 윈도우에서 리퍼는 C:\Program Files\REAPER (x64)에 설치된다. 사용자 가이드 등 아무 PDF 파일을 이 디렉토리에 넣는다면 리퍼의 Help > Documentation 메뉴에 아래에서 그 파일을 열 수 있게된다. 예를 들어 COCKOS ReaPlug VST 플러그인이나 SWS 익스텐션 등, 몇몇 선택적 설치 파일들은 설치 경로의 하위 폴더들에 설치된다. 이 경로상의 모든 것들은 해당 컴퓨터를 이용하는 모든 사용자들이 사용할 수 있게 된다. 사용자 특화된 변경이나 설정 등의 특성들은 Applications Data 또는 AppData 폴더에 저장된다. 이 위치는 윈도우 버전에 따라 달라질 수 있다. MacOS에 관해서는 공식 설명서를 참고한다.
1.5.3. Application Data와 하위 디렉토리
리퍼의 AppData 또는 Application Support 폴더에 열어보려면, 리퍼 메인 메뉴의 Options > Show REAPER resource path in explorer/finder 명령을 선택한다. 여러 하위 디렉토리와 파일들이 있을 것이다. 대개는 이름만 봐도 쓰임새를 알 수 있다. 아래는 몇몇 주요 항목들에 대한 설명이다.
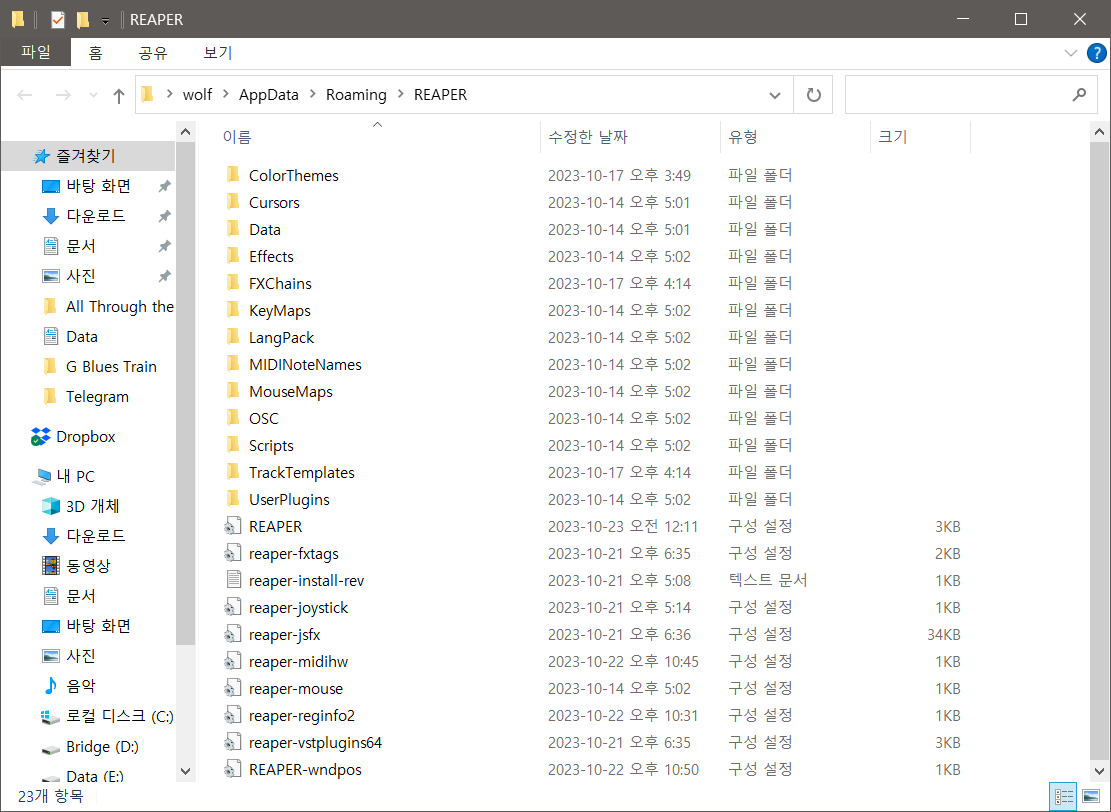
1. FXChains: 작업 과정에서 만든 FX 체인들이 이 폴더에 저장된다.
2. MenuSets: 변경한 메뉴와 툴바 데이터가 저장된다.
3. Data: 트랙이나 툴바의 아이콘 등의 정보가 저장된다.
4. Effects: JS 이펙터들이 이 폴더에 저장된다.
5. preset-vst-.ini: 각각의 VST 플러그인에 대해 프리셋들이 별도의 파일에 저장된다.
6. REAPER.ini: 모든 옵션, 설정, 마지막으로 사용한 스크린 레이아웃 등, 최근 사용한 프로젝트 히스토리 등의 정보가 저장된다.
7. reaper-dxplug-ins.ini와 reaper-vstplug-ins.ini: 설치된 플러그인들에 대한 정보가 저장된다.
8. reaper-reginfo.dat and reaper-reginfo.ini: 사용권 등록 정보가 저장된다.
9. reaper-recentfx.ini: 최근 사용된 FX의 목록이 저장된다.
10. screensets.ini: 윈도우 스크린 설정의 세부 사항들이 저장된다. 트랙 화면 설정은 관련된 프로젝트 파일 .RPP에 저장된다.
모든 설정 파일들은 단순 텍스트 파일이다. 즉, 노트패드와 같은 편집기로 열어서 직접 수정할 수도 있다는 얘기다. 대개는 직접 수정하지 않겠지만, 혹시라도 직접 수정하게 된다면, 만약의 사태에 대비해 반드시 복사본을 만들어 두길 권장한다. 반면에 .app, .dmg, .exe 또는 .dll 확장자를 가진 파일들은 절대로 텍스트 편집기로 열어서 편집하면 안 된다.
1.6. 지역화 언어 팩
리퍼의 메뉴, 대화 상자, 툴팁 등을 바꿔 줄 언어 팩을 선택할 수도 있다. 언어 팩은 Preferences 윈도우의 General 페이지에서 바꿔 줄 수 있다.
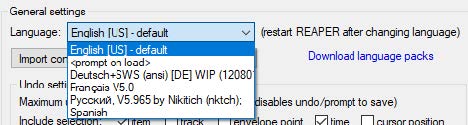
다른 언어 팩을 설치하려면 Download language packs 링크를 클릭한다. 리퍼 언어 팩 URL로 연결될 것이다 (불행히도 한국어 언어 팩은 아직 없다). 언어 팩을 선택해서 다운로드 한 후, Preferences 윈도우를 닫고 Options > Show REAPER resource path in Explorer/Finder 명령을 이용해서 리퍼의 리소스 폴더를 연다. 그리고는 다운로드 받은 언어 팩 파일(들)을 이 폴더에 넣는다. 특정 언어 팩을 선택하려면, Preferences 윈도우의 General 페이지에 있는 목록 상자에서 선택한다. 새 언어를 적용하려면 리퍼를 다시 시작해야 한다.
1.7. 리퍼 업데이트
리퍼는 (너무나 자주) 업데이트된다. 아무때고 업데이트 된 리퍼를 확인해서 다운로드 할 수 있는데, 이전 버전을 먼저 제거하고 설치할 필요는 없다. 현재의 설정은 자동으로 넘겨져 유지된다.
Tip: Options > Preferences > General > Startup Settings 아래에는 프로그램이 시작될 때 자동으로 업데이트를 확인하는 옵션이 있다. 기본적으로는 활성화되어 있는데, 원한다면 이 옵션을 끌 수도 있다.
1.8. 리퍼 제거하기
새 버전을 위해서 리퍼를 제거할 필요는 없다. 그냥 설치하면 이전 버전이 새 버전으로 업그레이드 된다. 그러나 어떤 이유에서건 리퍼를 제거하고 싶다면, MacOS에서는 간단하게 REAPER 아이콘을 휴지통에 버리고 ~/Library/Application Support/REAPER 폴더를 지워버리면 된다. 윈도우에서는 아래 절차를 따른다.
1. 윈도우 시작 버튼을 클릭하고, 프로그램 목록에서 REAPER를 선택하고 그 아래 Uninstall REAPER를 선택한다.
2. REAPER Uninstall Wizard가 나타나면 Uninstall 단추를 클릭한다.
3. 제거 과정이 끝나면 Close 단추를 클릭하고 확인 대화창에서 OK를 선택한다.
Tip: 나중에 다시 리퍼를 설치할 가능성이 있다면 남겨진 파일들을 지우지 않는 것을 권장한다. 나중에 다시 설치하면 이전의 설정들을 그대로 불러와 사용할 수 있게 해준다.
이 아래는 같은 내용을 영문으로 번역한 것임.
The above is a Korean translation of the same below.
1.1. Downloading REAPER
To install REAPER, first up, download from http://www.cockos.com/reaper/download.php.
Here, I only deal with the installation process for Windows 10.
1.2. Installing REAPER on a MacOS
Here, I only deal with the installation process for Windows 10. For Mac (MacOS), see the official guide.
1.3. Installing REAPER on a Windows PC
1. Find the install file.
2. Double click the file to start the installation.
3. Click the I Agree button.
4. For a normal install, accept the default folder (see note below).
5. If you need to, enable the Portable install option (see note below), then click Next.
6. Select all the elements (REAPER is very small) and click on Install.
7. Wait the installation, and when prompted, click on Close. You will be asked if you wish to run the program now. In this case, choose No.
Note: If you are installing REAPER for the first time, or if you wish to replace an installed version of REAPER, you should not enable Portable install. If you wish to install this alongside an existing installed version (such as 5.xx), then you should change the destination folder (e.g. to \REAPER6) and enable Portable install. This will ensure that your existing settings and preferences will be preserved separately.
1.4. The Install Options (Windows only)
Description below is a summary of installation options.
1.4.1. Optional Functionality
JSFX library: The extensive collection of audio and MIDI effects.
VST/x64 VST bridging/firewalling: The options for greater flexibility in the use of VST plug-ins.
ReaMote, ReWire, ReaRoute: The options for advanced routing capabilities, such as controlling the passing of audio/MIDI material between REAPER and other programs.
Configure Windows to save REAPER crash dumps: The option to be saved diagnostic information in the event of REAPER crashing.
1.4.2. Desktop Icon
The option for REAPER shortcut icon.
1.4.3. Start Menu Shortcuts:
The option to ensure that REAPER is added to your Windows Start Menu.
1.4.4. Associate with RPP Files:
The option for REAPER to be linked .rpp Files (REAPER Project files).
1.5. REAPER’s Installed Folders and File Location
The locations to which REAPER's various resources are installed will depend on whether you are using OS X or Windows, and even then which version.
1.5.1. The Registry (Windows only)
REAPER does not store any data in Windows Registry. Windows will set up an key for REAPER under HKEY_ LOCAL_MACHINE > Software, but it contains no data other than keeping a record of your file movements in Registry areas such as its MUICache and creating file associations.
1.5.2. The REAPER Install Directory
By default, REAPER on Windows installs to C:\Program Files\REAPER (x64). Copy into this directory any PDF files (such as User Guide) that you want to be able to access from REAPER's Help > Documentation Menu. Some of the optional install items (for example COCKOS ReaPlug VST plug-ins and the SWS Extensions) are held in sub-folders. Anything stored in this directory is accessible to all users of REAPER on this computer. Most REAPER features (such as configuration files and custom settings) are placed into an Applications Data or AppData folder. The location of this will depend upon which version of Windows you are using. For MacOS, see the offical User Guide.
1.5.3. The Application Data / Support Directory
To access the REAPER AppData or Application Support folder, choose Options > Show REAPER resource path in explorer/finder from REAPER's main menu. You should find a number of sub-directories and files here. Many of these are self-explanatory. Some of the main items you can expect to find there are listed below.
1. FXChains: any FX Chains that you create will be stored here.
2. MenuSets: custom menu and toolbar data is stored here.
3. Data: information such as track icons and toolbar icons and so on.
4. Effects: this folder is where JS effects are stored.
5. preset-vst-.ini: for each VST plug-in, a separate file is used to store any presets that you have created or imported.
6. REAPER.ini: this includes all of Options, Preferences settings, information about last screen layout, and recently used projects history.
7. reaper-dxplug-ins.ini and reaper-vstplug-ins.ini: these files store information about installed plug-ins.
8. reaper-reginfo.dat and reaper-reginfo.ini: these files store your product registration data
9. reaper-recentfx.ini: this file stores a list of recently used FX.
10. screensets.ini: this file stores details of your windows screen sets, but track screen sets are stored with the relevant .RPP file.
All of the settings, preferences and custom files are text files. Any of them can be opened and modified using a text editor such as Notepad. Of course, most probably you will never need to do this, and if you do, you should always take a copy first, just in case of any errors or accidents. However, you should never try to use a text editing program to view or edit any file ending in .app, .dmg, .exe or .dll
1.6. Localization and Language Packs
You can select a language pack for REAPER to use for its menus, dialog boxes, tool tips, and so on. Language packs are managed from the General page of REAPER's Preferences. To install other language packs, click on the link Download language packs. This will take you to a REAPER Language Packs URL. After downloading your language, close the Preferences window and use the command Options > Show REAPER resource path in Explorer/Finder to display REAPER's resource folders. Next, drag and drop the downloaded file(s) into the LangPack folder. To select a language pack, select from the drop down list and click on OK in the General page of Preferences window. You will need to restart REAPER for the language to take effect.
1.7. REAPER Software Updates
REAPER is updated (too very) frequently. You can check for updates at any time simply to download and install. There is no need to first uninstall. Existing preferences and settings will automatically be carried over.
Tip: An option is available under Options > Preferences > General > Startup Settings to have REAPER automatically check for updates each time the program is started. By default, this option is enabled. If you do not wish you can disable it.
1.8. Uninstalling REAPER
There is no need to uninstall your current version of REAPER before installing a new one. Your existing installation will automatically be upgraded from the new installation. However, should you wish to uninstall REAPER for any reason, MacOS users should simply drag the REAPER icon into Trash and then remove the folder ~/Library/Application Support/REAPER. Windows users should follow this procedure:
1. Click on the Windows Start button, then All Programs, then REAPER then Uninstall REAPER.
2. When the REAPER Uninstall Wizard is displayed, click on Uninstall.
3. When the uninstall process is finished, click on Close.
Tip: If you are likely to be reinstalling REAPER at some later date, do not remove these files. This will ensure that your previous settings and preferences will be recalled when it is reinstalled.
'오락과 여흥 > Reaper (리퍼)' 카테고리의 다른 글
| 리퍼 사용자 가이드 - 2-2. 재생, 내비게이션 (1) | 2023.11.03 |
|---|---|
| 리퍼 사용자 가이드 - 2-1. 프로젝트 설정 (0) | 2023.11.02 |
| 리퍼 사용자 가이드 - 1-3. 기본설정 (1) | 2023.11.02 |
| 리퍼 사용자 가이드 - 1-2. 시작하기, 화면구성 (0) | 2023.10.24 |
| 리퍼 사용자 가이드 - 0. 요약 번역을 시작하며(목차 포함)... (2) | 2023.10.11 |


댓글