
1.15. 리퍼 초기 상태와 설정들
만약 처음으로 리퍼를 설치했다면 초기 상태와 설정이 적용되었을 것이다. 반면에 기존 버전을 대체해서 설치했다면, 기존 설정들이 그대로 전달되어 유지되고 있을 것이다.
1.16. 오디오 장치 설정하기
녹음이나 재생 등의 작업을 하기 전에, 가장 먼저 오디오 장치 설정을 해야한다.
1.16.1. PC 윈도우에서 오디오 장치 설정하기
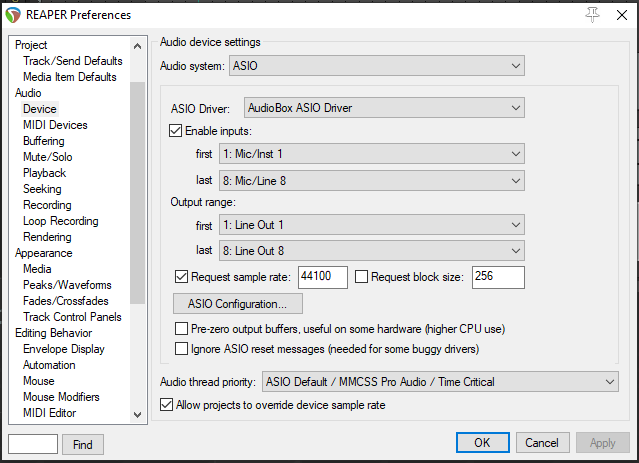
오디오 장치를 설정하려면, 리퍼의 메인 메뉴에서 Options > Preferences 메뉴를 선택하고, 왼쪽의 목록 상자에서 Audio 아래의 Device 항목을 선택한다. 만약 가지고 있는 사운드카드나 오디오인터페이스가 ASIO 드라이버를 지원한다면, 그것이 보통 가장 좋은 선택이 된다.
오디오 장치 설정 창에서 아래 옵션들을 적절하게 설정해 줘야 한다.
1.16.1.1. Audio System
이 창의 나머지 항목들은 이것을 어떻게 선택하느냐에 따라 달라진다. 만약 가지고 있는 사운드카드, Firewire 또는 USB 장치가 ASIO 드라이버를 지원한다면 그것을 선택하라. 아니라면 WASAPI 옵션이 보통 가장 좋은 선택이 될 것이다. 좋은 성능을 위해 WASAPI 드라이버를 Exclusive 모드로 선태해야 할 수도 있다.
1.16.1.2. Enable Inputs
리퍼를 이용해 녹음을 하려면 이 옵션을 적절하게 설정해야 한다.
1.16.1.3. Input Range
만약 장치가 다중 입력을 지원한다면 (최대 512개까지), 입력을 받고자 하는 첫 번째와 마지막을 선택한다. 아래 예제에서는 8개의 입력이 가능한데, 마이크 또는 라인 입력을 어떤 조합으로도 최대 8개까지 동시에 녹음할 수 있게 된다.
1.16.1.4. Output Range
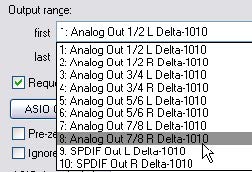
만약 장치가 다중 출력을 지원한다면 (최대 512개까지), 마찬가지로 첫 번째와 마지막을 선택하면 된다. 보통 마스터 버스는 한쌍의 출력에 연결되기는 하지만, 필요하다면 다르게 연결해 사용될 수도 있다.
1.16.1.5. Request sample rate/block size
오디오 장치의 샘플 레이트와 블록 크기를 지정하려면 이 옵션을 선택해야 한다. 사운드 카드 자체 설정 소프트웨어의 설정값을 따르고자 한다면 이 옵션을 선택하지 않는다. 적절한 값을 모르겠다면 44,100와 512로 시작해볼 수도 있다. ASIO를 선택한 경우라면 48,000과 256이 시작 값으로 적당할 것이다.
1.16.1.6. ASIO Configuration
연결된 사운드 카드나 오디오 장비의 제어 소프트웨어를 불러온다.
1.16.1.7. Audio Thread Priority
더 높은 우선 순위를 지정하면 다른 스레드(예를 들어 그래픽)보다 오디오 스레드가 우선 처리되게 된다.
1.16.2. MacOS에서 오디오 장치 설정하기
여기서는 윈도우 10의 경우만 다룬다. MacOS와 관련해서는 공식 설명서를 참고하기 바란다.
1.17. 튐과 찌직거림 현상
흔치 않지만, 음악 재생 중에 원치않는 튐이나 찌직거림 현상이 발생할 수 있는데, 이는 리퍼 문제라가 보다는 컴퓨터 문제이며, 맥 보다는 윈도우 PC에서 더 발생하는 경향이 있다. 대개는 오디오 장치의 설정이 현재 컴퓨터 하드웨어와 맞지 않을 경우 이런 현상이 발생한다. 간단한 대응 방법으로는, Preferences > Audio > Device 페이지의 block size를 조정해볼 수 있다. 우선 128에서 시작해서 256, 512, 768 그리고 1024 등으로 늘려가며, 튐이나 찌직거림 현상이 발생하지 않는 가장 낮은 설정 값을 찾아본다. 또한 22장의 관련 주제들을 살펴보는 것도 좋을 것이다.
1.18. 입력 알리아싱
리퍼는 오디오 입력 채널의 이름을 알아보기 쉬운 별명으로 바꾸는 기능을 지원한다. 입력 알리아싱(Aliasing)은 Audio 설정 창의 Input Channel Name Aliasing/Remapping 옵션을 통해 할 수 있다. 구체적인 방법은 아래 출력 알리아싱과 비슷하다.
1.19. 출력 알리아싱
리퍼는 오디오 출력 채널의 이름을 알아보기 쉬운 별명으로 바꾸는 기능도 제공한다. 기본적으로 출력 채널의 이름들은 아래 그림과 비슷할 것이다. 확실히 확 와닫는 이름들은 아니다.
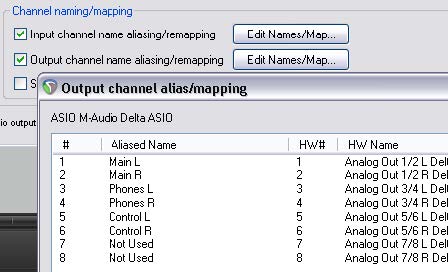
이 이름들에 별명을 부여하면, 마스터가 어디로 보내지는지 하드웨어 이름이 아닌 바로 알 수 있는 별명으로 결정할 수 있게 된다. 출력 알리아싱을 만드는 방법은 다음과 같다.
1. Options > Preferences 명령을 선택한다.
2. Audio 항목을 선택하고, Channel Naming/Mapping 섹션에서 Output Channel Name Aliasing 옵션을 체크한다.
3. Edit Names/Map... 단추를 클릭한다.
4. 원하는 항목의 Aliased Names 컬럼에 있는 이름을 더블클릭하고, 보기 쉬운 별명을 주고 OK 단추를 클릭한다.
5. 다시 Output Channel Alias/Mapping 창에서 OK 단추를 클릭해 변경사항들을 저장하고 창을 닫는다.
6. 설정 창의 OK 단추를 클릭해서 닫는다.
이렇게 하면 자동으로 리퍼의 모든 화면들에서 지정한 별명이 보이게 된다.
1.20. MIDI 설정
미디를 사용하려면 미디 장치(예를 들어 미디 키보드)를 활성화시켜야 한다. 메인 메뉴에서 Options > Preferences를 선택하고, Audio 항목 하위의 MIDI Devices 항목을 선택한다. 여기서 나열된 미디 입출력 장치들 중 필요한 장치를 순서대로 선택하면서, 그 이름 위에서 마우스 오른쪽 단추를 클릭하면 장치 활성화 옵션을 선택할 수 있다.
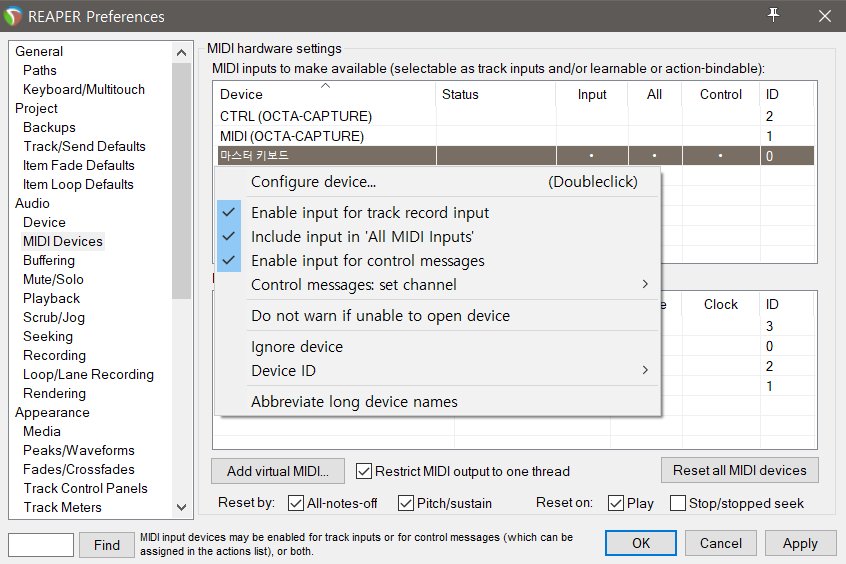
또한 장치 이름을 더블클릭하거나 마우스 오른쪽 클릭 후 컨텍스트 메뉴에서 Configure input... 또는 Configure output... (버전 7에서는 둘 다 Configure device...로 바뀜) 명령을 선택하면 미디 장치 설정 창을 띄울 수 있다.
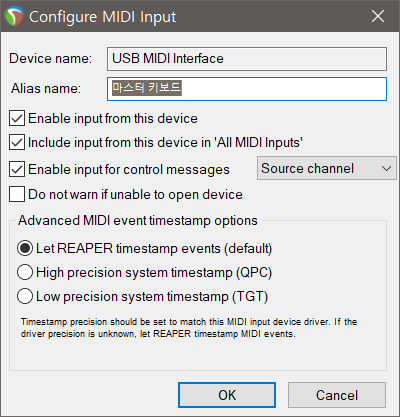
여기에서 장치의 별명(alias)을 줄 수도 있고, 고급 타임 스탬프 옵션을 설정할 수도 있으며, 장치를 미디 컨트롤러로 사용하기 위해 Enable input for control messages 옵션을 선택할 수도 있다 (15장에서도 다룬다). 리퍼에서 Behringer BCF2000 or BCR2000 같은 컨트롤 서피스를 사용하려면 Control 입력 모드 만으로 사용하는 것이 좋다. 제어 장치 사용법에 대해서는 주로 12장과 15장에서 다룬다.
장치 목록에는 현재 연결되지 않은 장치가 보일 수도 있는데, 이 경우 Forget device 옵션을 선택할 수도 있다. 나중에 연결된 후 다시 활성화시키고 설정할 수 있다. 미디 장치 설정 창의 아래쪽에서는 Reset by (All-notes-off와 Pitch/sustain) 옵션과 Reset on (Play와 Stop/stopped seek)을 설정할 수 있다. 이 설정은 오직 하드웨어 장치에만 영향을 준다. 설정이 끝났다면 OK 단추를 눌러 변경 사항들을 저장하고 설정 창을 닫는다.
이 섹션은 미디 설정에 있어서 일반적인 사항들만 다루고 있다. 프로젝트별 설정에 대해서는 2장을 참고한다. 특히나 작업이 주로 미디 위주로 진행된다면 프로젝트의 기본 타임 베이스 설정을 바꾸고 싶을 수도 있다. 이 내용 역시 2장에서 다룬다.
1.21. VST, CLAP and LV2 플러그인 설정
오디오 설정과 마찬가지로, 리퍼에는 플러그인 설정 관련 창들이 여럿 있지만, 적어도 처음에는 대부분 기본 설정을 그대로 사용할 수 있다. 그러나 VST나 VSTi 플러그인(VST3 포함)들을 가지고 있다면, 그것들이 어디에 있는지는 리퍼에게 인식시켜 줄 필요가 있다. VST3 플러그인은 다른 플러그인들과 별도의 경로에 보관하는 것이 좋다.
Options > Preferences 메뉴를 선택하고, Plug-ins 항목 하위의 VST 항목을 선택한다. 가지고 있는 플러그인들의 경로를 지정하려면 Edit path list… 단추를 클릭한다. 그러면 몇 가지 옵션들을 선택할 수 있다. 먼저 Add system VST paths 옵션은 많은 플러그인들이 설치되는 기본 디렉토리들을 확인한다. 그러나 기본 경로와는 다른 곳에 분산시켜 뒀다면 리퍼가 그 경로를 찾지 못할 수 있다. 이 경우는 Add path... 옵션을 선택하고 설치 경로를 하나씩 따로따로 추가해줘야 한다.
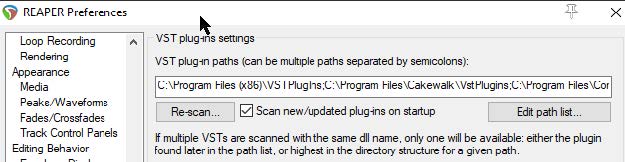
경로 설정 후에는 Re-scan... 단추를 클릭해서 VST와 VSTi 폴더들에 있는 항목들을 검색해 사용 가능하도록 해줘야 한다. Re-scan... 단추를 클릭하면, 리퍼는 모든 하위 디렉토리들을 다 스캔해서 플러그인들을 찾으며, 이전에 읽어 들이기에 실패했던 플러그인도 다시 확인한다. 기본적으로 리퍼는 프로그램을 시작할 때마다 설정된 디렉토리들을 스캔해서 새 플러그인들을 찾는다. Scan new/updated plug-ins on startup 옵션을 이용해 이 설정을 꺼줄 수 있다. 22장에서는 VST 설정에 대한 더 많은 정보를 다룬다.
VST와 VST3에 대한 중요 노트: 리퍼는 설정된 디렉토리 목록의 왼쪽부터 오른쪽으로, 순서대로 VST 플러그인들을 찾아나간다. 이때, VST3 플러그인의 이름이 VST 버전과 조금이라도 다르면 둘 다 찾아낸다. 그러나 두 이름이 정확히 같다면 마지막에 찾은 것만이 활성화된다. 따라서 VST3 디렉토리들을 목록의 마지막에 두는 것이 좋을 것이다.
특별히 리눅스에서는, 리퍼가 LV2 플러그인들도 자동으로 찾고 활성화시킨다. 또한 Clever Audio Plugin (CLAP) 형식의 플러그인들도 지원한다. 이 플러그인들을 찾고 설치하고 관리하는 다양한 설정들은 Options > Preferences > Plug-ins > LV2/CLAP 페이지에서 찾을 수 있다.
이 아래는 같은 내용을 영문으로 번역한 것임.
The above is a Korean translation of the same below.
1.15. REAPER’s Default Settings and Preferences
If you are installing REAPER for the first time, the factory default settings and preferences will be applied. If you are installing REAPER over the top of, and replacing, an earlier version, existing settings and preferences will be ported across to the new installation.
1.16. Setting Up For Audio
Before you can record or play anything, you will need to set up your audio preferences.
1.16.1. Setting Up For Audio (PC Windows)
To set up your Audio Device, choose Options > Preferences from REAPER's Main Menu, then select Device under Audio from left list box. If your sound card or audio interface includes ASIO drivers, then these should usually be preferred. On the Audio Device Preferences screen, you should set the following options.
1.16.1.1. Audio System
The other items on this screen will vary with the audio system selected. Choose ASIO and ASIO drivers if they are available for your sound card or Firewire or USB device. Otherwise, WASAPI will usually give better performance than will the default Direct Sound setting. You might need to set WASAPI to Exclusive mode.
1.16.1.2. Enable Inputs
This option needs to be turned on if you wish to use REAPER for recording.
1.16.1.3. Input Range
If your device has multiple inputs (up to 512), specify the first and last that you want to be available. In this example, eight inputs are available, allowing up to eight microphones or lines (in any combination) to be used simultaneously for recording.
1.16.1.4. Output Range
If your device has multiple outputs (up to 512), specify the first and last that you wish to be available. Usually, your MASTE7R bus will direct output to a single pair of outputs, but you can use the others also if you wish.
1.16.1.5. Request sample rate/block size
Tick these to set sample rate and block size for your audio device here (generally preferred), or leave these blank if you wish to use your sound card's own control software to set these. If unsure, start with 44100 and 512.
1.16.1.6. ASIO Configuration
Clicking this button gives you direct access to the Control Software for your sound card or other audio device.
1.16.1.7. Audio Thread Priority
Assigning a higher priority will ensure that audio threads will be processed ahead of other threads (e.g. graphics).
1.16.2. Setting Up For Audio (MacOS)
Here, I only deal with the case of Windows 10. For MacOS, see the official guide.
1.17. Pops and Clicks
Uncommon, unwanted pops and clicks being heard when you play back your music is a computer issue rather than a REAPER specific issue, and is generally less likely to occur with a Mac than with a PC. If you encounter this problem, then most probably all it means is that your audio device settings are not right for your computer. As a quick fix, try adjusting the block size (Preferences, Audio, Device), starting at 128 and working up thru, 256, 512, 768 or 1024 to find the lowest setting for your system at which you can play back your music without any pops or clicks getting in the way. If you do encounter this problem, you should also read Chapter 22 to learn more about this topic.
1.18. Input Aliasing
REAPER supports Input Aliasing. This is the ability to give your own names to your audio inputs. Input Aliasing is accessed from the Audio Preferences screen. Select Input Channel Name Aliasing/Remapping.
1.19. Output Aliasing
REAPER also supports Output Aliasing. This enables you to give names to your audio outputs, names that make sense to you. By default, your outputs will have names something like those shown here (below right). Clearly, these names are not very useful to you. By assigning aliases to these outputs, you can ensure that, for example, when determining the destination of the output from your Master, your own names will be displayed, instead of the hardware device names. To create output aliases.
1. Choose the Options > Preferences command.
2. Select the Audio page, and in the section Channel Naming/Mapping make sure you have ticked the option Output Channel Name Aliasing.
3. Click on the Edit Names/Map button.
4. Double-click in the Aliased Names column on each item. After typing your preferred alias, click on OK.
5. Again, click on OK to save and close the Output Channel Alias/Mapping window.
6. Click on OK to close the Preferences dialog box.
Your specified names will be automatically used throughout REAPER.
1.20. Setting Up For MIDI
To use MIDI, you need to enable your MIDI devices (for example, with a MIDI Keyboard). Choose Options > Preferences from the Main Menu, then select the MIDI Devices under Audio. You can select in turn each of the listed MIDI Input and Output devices, right-click over its name, then choose Enable Input.
You can double-click on any input device name or right click over the device name and choose Configure Input or Output (for ver. 7.x, Configure device...) from the context menu to display its Configure MIDI Input settings.
This enables you to assign your own name (or alias) for the device, or to specify your advanced timestamp options (if required). You can also Enable input for control messages if you wish to use the device as a MIDI controller (see also Chapter 15). If you wish to use a Control Surface, such as a Behringer BCF2000 or BCR2000, with REAPER, then you should set its input mode to Control Only. The use of Control Devices will be explained later in this guide, notably in Chapters 12 and 15.
The device list may include items that are not present. For these you have an option to Forget device. Alternatively, you can enable/configure such a device (input or output) so that it can be used when present. Towards the bottom of the MIDI Devices preferences window, there are options for Reset by all-notes-off and/or pitch/sustain, and Reset on play and/or stop/stopped seek. These affect only hardware devices. When finished, clicking on OK will close the Preferences box and cause your settings to be remembered.
This section has covered the general issues involved in setting up your system for working with MIDI. For project specific settings and options, see Chapter 2. In particular, if you are working primarily with MIDI material, you may wish to change the default project timebase setting. This too is explained in Chapter 2.
1.21. VST, CLAP and LV2 Plug-ins
As with Audio Preferences, REAPER has several pages of Plug-in Preference screens, but most can (at first at least) be left to their default settings. However, if you have a collection of VST and/or VSTi Plug-ins (including VST3), REAPER needs to be told where to find them. Note that VST3 plug-ins should be kept in directories separate from other plug-ins.
Choose the Options > Preferences command, then select VST in the Plug-ins section.
You can use the Edit path list… button to locate your plug-ins. This offers you a number of options. Add system VST paths will detect and select those directories used by default for installing many plug-ins. But if your VST plug-ins are spread across several folders REAPER might not be able to locate all of these for you. In this case you may need to use the Add path... option several times, each time selecting one of your folders. Use the OK button in the Browse for folder window each time after selecting the folder name.
Clicking the Re-scan... button will then make the contents of your VST and VSTi folder(s) available immediately. REAPER will also scan any subfolders. Re-scan... button will also check for any listed plug-ins that failed to scan earlier. By default, REAPER will scan the specified directories to look for new plug-ins each time it starts up. You can disable this by turning off the option Scan new/updated plug-ins on startup. You can find more information about the various VST Preferences settings and options in Chapter 22.
Important note for VST and VST3: REAPER scans for VST plug-ins according to your directory list, from left to right. If a VST3 plugin is named even slightly differently from its VST version, both will be installed. If both are named identically, only the last one found will be installed. Consider making your VST3 directory last in the list.
Of special use to Linux users, REAPER will also automatically scan for LV2 plug-ins, and install any that it finds. REAPER also supports Clever Audio Plugin format (CLAP) plug-ins. Various options for scanning and installing and managing these plugins are available on the Options > Preferences > Plug-ins > LV2/CLAP page.
'오락과 여흥 > Reaper (리퍼)' 카테고리의 다른 글
| 리퍼 사용자 가이드 - 2-2. 재생, 내비게이션 (1) | 2023.11.03 |
|---|---|
| 리퍼 사용자 가이드 - 2-1. 프로젝트 설정 (0) | 2023.11.02 |
| 리퍼 사용자 가이드 - 1-2. 시작하기, 화면구성 (0) | 2023.10.24 |
| 리퍼 사용자 가이드 - 1-1. 설치, 업데이트, 제거 (1) | 2023.10.13 |
| 리퍼 사용자 가이드 - 0. 요약 번역을 시작하며(목차 포함)... (2) | 2023.10.11 |


댓글